12 Serum Sound Design Tips You Need to Know
“Meta-music is when you create the tools with which artists each create their own body of work with, thus your influencing the entire landscape. I still get chills when I think about that. It’s so awesome to be able to push the entire needle of music.”
— Steve Duda, Creator of Serum
Let’s get something straight…
I’m not sure anyone could’ve predicted the impact that Xfer’s Serum has had on the entire landscape of music.
Originally released back in September of 2014, Steve Duda’s “perfect synth plugin” was immediately praised for its ingenuity and forward-thinking capabilities.
It promised "a truly high-quality sound" and a "visual and creative workflow-oriented interface to make creating and altering sounds fun instead of tedious.”
And boy, did it deliver.
Today, we’re going to look at a few of our favorite Serum sound design tips that you can apply to your music right away.
Let’s get to work.
1. Play with Warp Modes
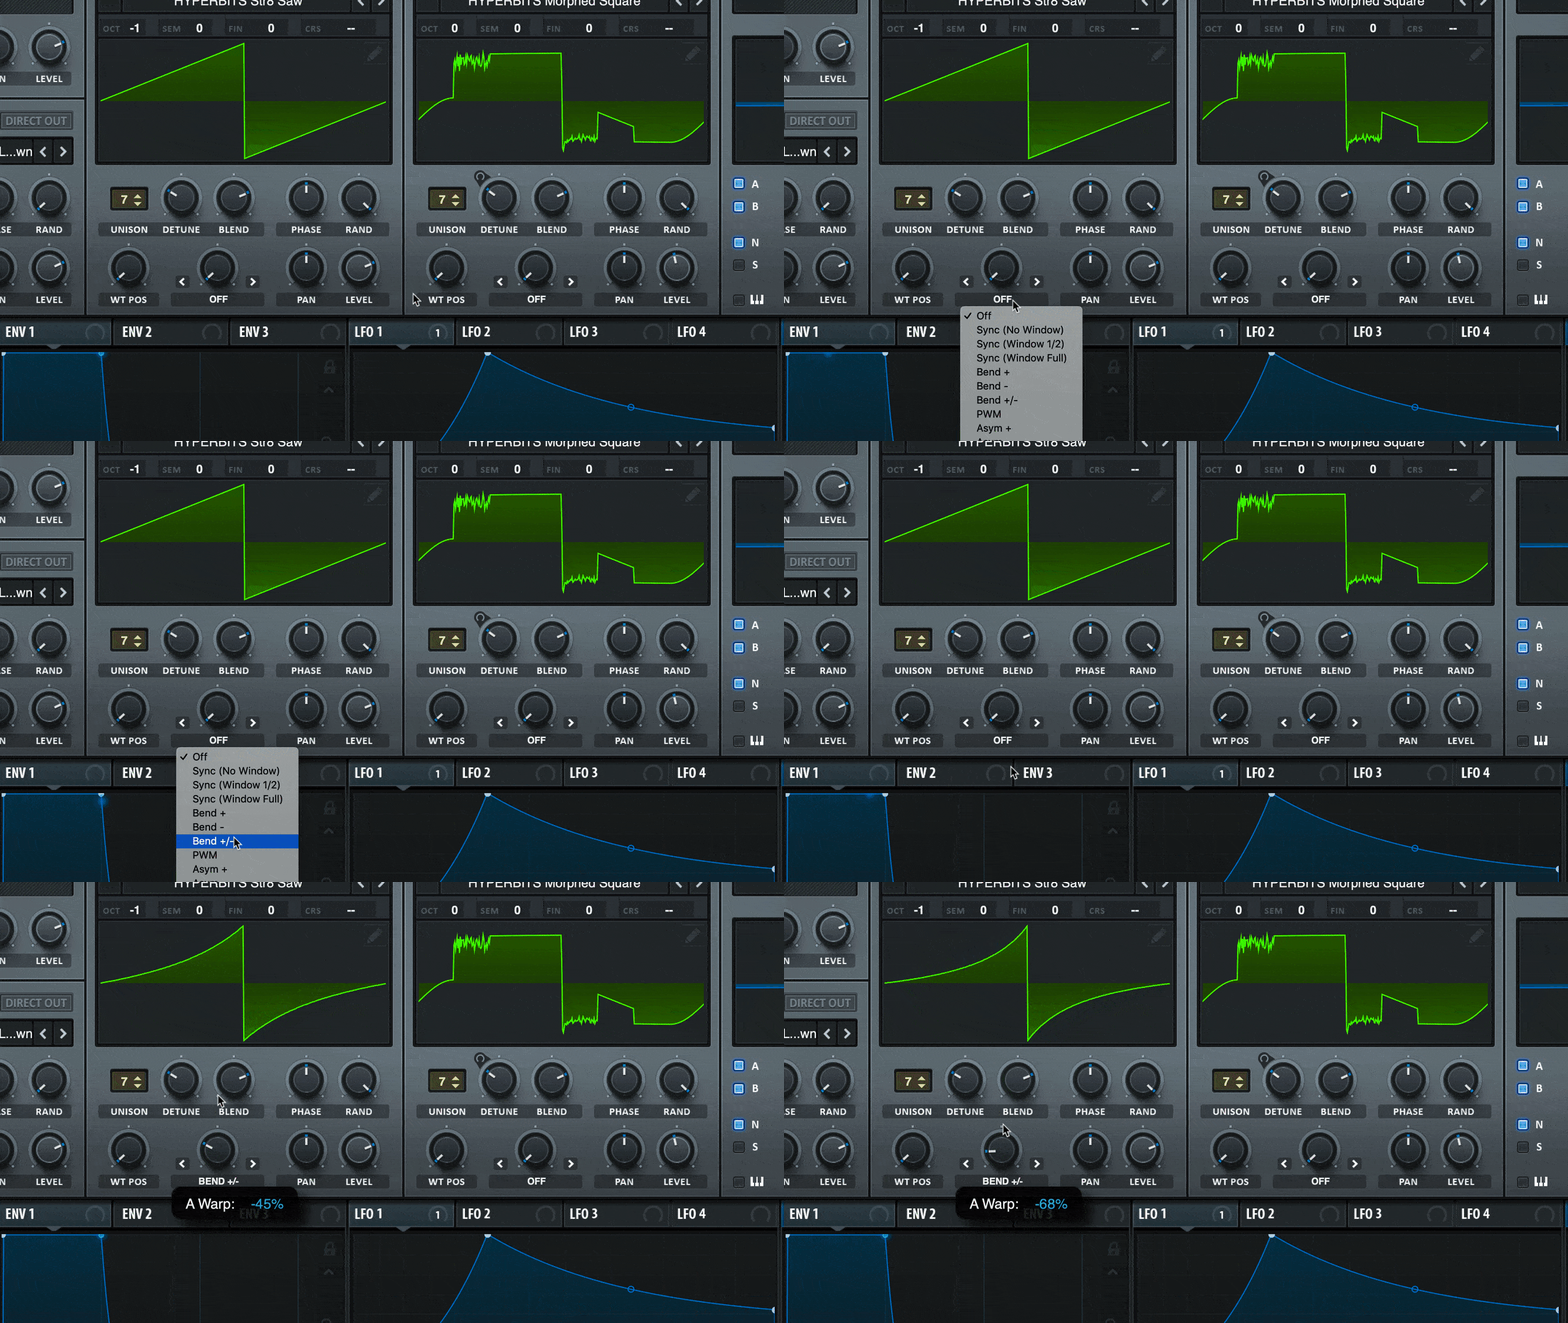
Warp modes allow you to manipulate the playback sound of the Wavetable Oscillator. At the end of the day, this allows for countless timbre changes with extreme ease.
Pro tip: try automating the warp modes for even more movement, interest. There is a TON of room for experimentation here.
By the way, here’s a quick breakdown of all the different warp modes available to you in Xfer's Serum and exactly what they do when manipulating your wavetable:
- Self-Sync is a formant-shifted effect that plays/repeats fast than normal and abruptly restarts at the ‘correct’ length. Use this on buzzy sounds.
- Windowed Sync provides a smooth fade across the waveform which can help soften the sound.
- Bend + pinches or bends the waveform inwards towards the middle of the wave cycle.
- Bend - pulls or bends the waveform outward towards the edges of the wave cycle
- Bend+/- allows for both of the last two warp modes.
- PMW pushes the entire waveform to the left, which can be useful on square waves.
- Asym + similar to “Bend”, but bends the entire waveform to the right.
- Asym - bends the entire waveform to the left.
- Asym +/- bends the entire waveform to the left or right
- Flip creates an instantaneous polarity flip (often called phase- inversion) on the waveform.
- Mirror creates a mirror-image of the waveform. Has an 'octaved' type of quality by 'doubling' the waveform into both halves of the wave cycle.
- Remap 1 custom remapping of the wave cycle within a graph to change how the waveform will remap. Click here for an awesome explanation of remap 1 from ADSR Sounds.
- Remap 2 a mirrored remapping. Same as above, but applies the graph to each half the waveform independently.
- Remap 3 a sine wave based remapping of the waveforms. Another option for remapping without attempting to draw fancy curves.
- Remap 4 a 4x remapping. Similar to Remap 2 (mirror) but now the graph takes place 4 times.
- Quantize similar to sample-and-hold, that is sample rate reduction. Taking place on the waveform itself, so the aliasing sound will follow pitch perfectly.
- FM (from other OSC) frequency modulation from the other oscillator. The other oscillator must be enabled for this to function.
- AM (from other OSC) same as above, except amplitude modulation instead.
- RM (from other OSC) same as above, except ring modulation.
- FM Noise OSC FM from the noise oscillator.
- FM Sub OSC FM from the sub oscillator.
2. Play with Direct Out
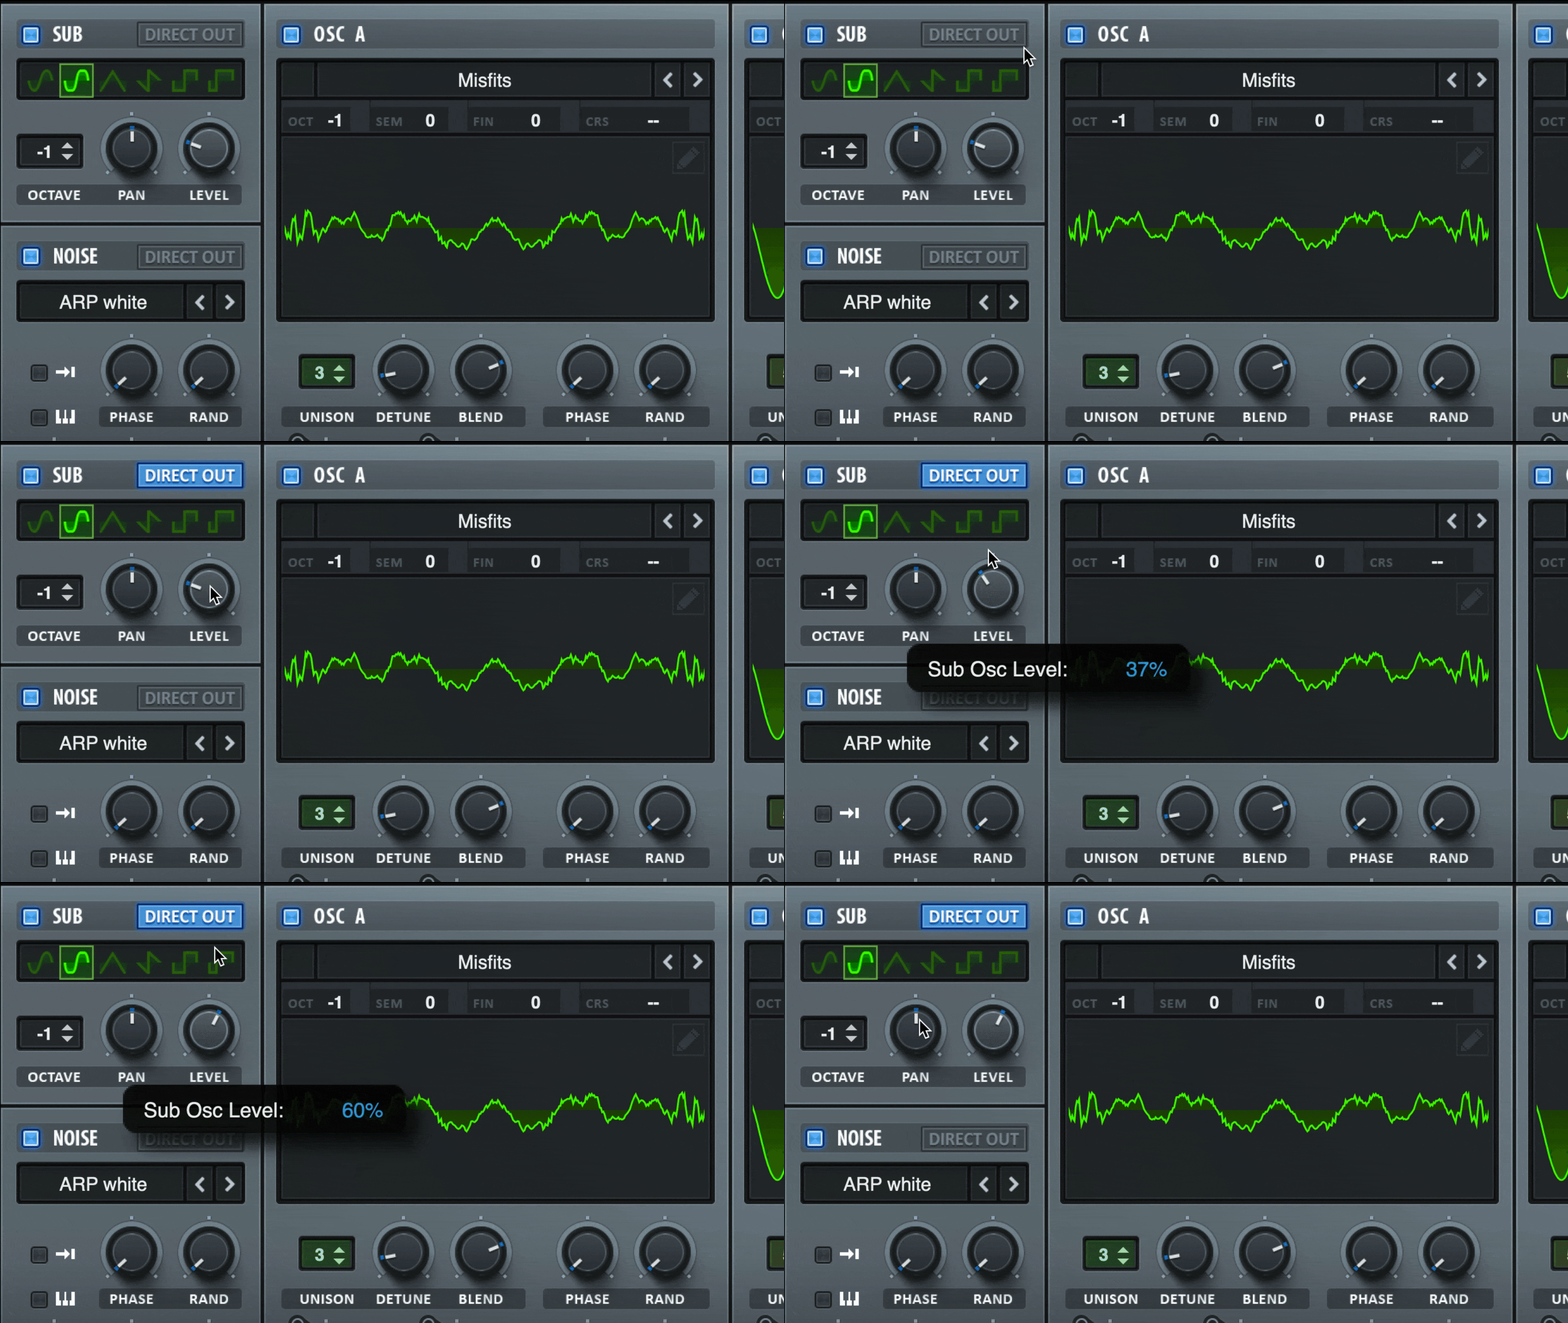
Technically, Serum is a 4 oscillator synth — oscillator A, oscillator B, the sub oscillator and the noise oscillator. This is important to note because the sub and noise oscillators are easy to overlook for someone new to Xfer’s Serum.
Direct out is a super powerful tool because it allows you to bypass all filters and effects on JUST the sub oscillator. When it comes to achieving a clean bottom end, this is extremely beneficial.
Plus, this allows for even more processing to the rest of your bassline across other oscillators because the sub will not be disrupted.
3. Turn On Velocity Sensitive Envelopes
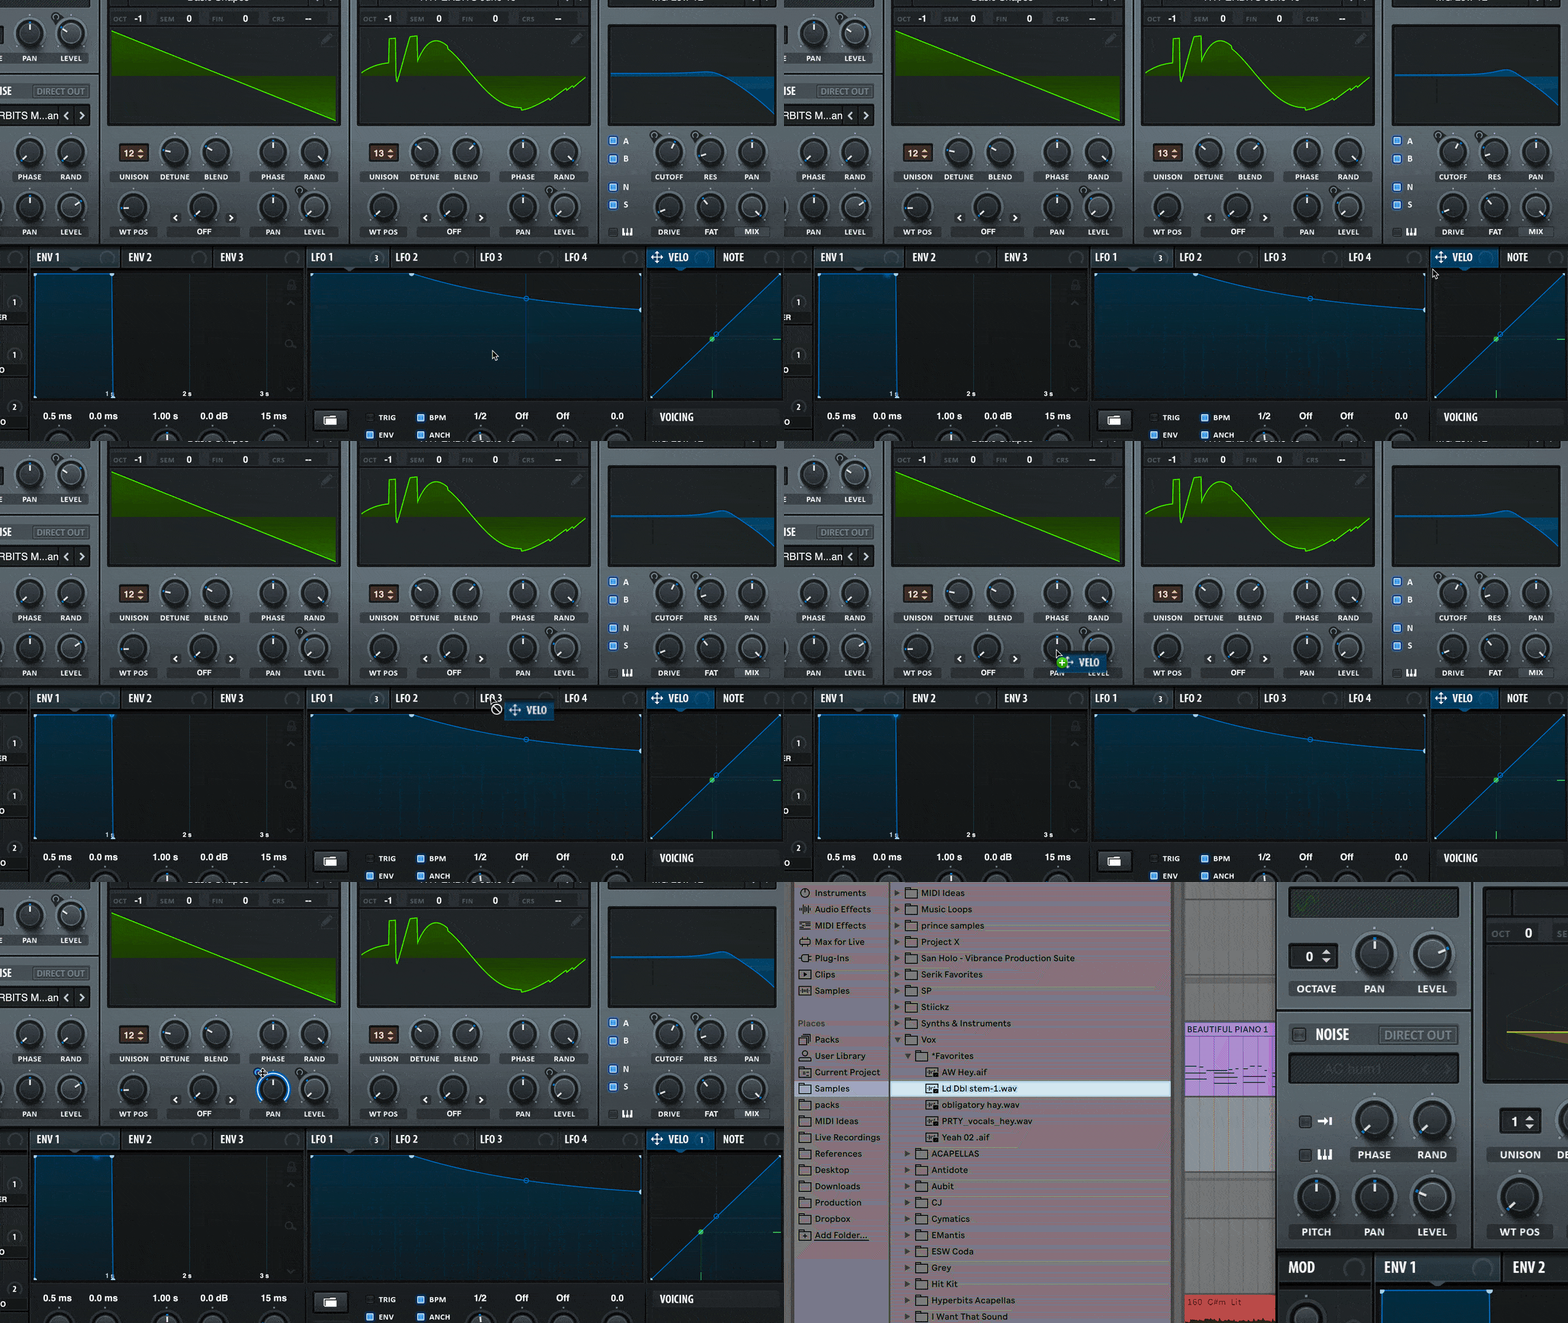
Velocity-sensitive envelopes can make any preset in Serum more human, organic and real because of one simple fact…
The patch will sound different depending on how hard you press the note.
What does that mean exactly?
Not only will your live performances retain their human imperfections, but this also means that when you program your melodies and chords, you can literally manipulate velocity as a parameter to make your sounds more human.
Interested in making your music more human? Here are 12 Movement Tips to Bring Your Music to Life.
4. Import Audio as Wavetables
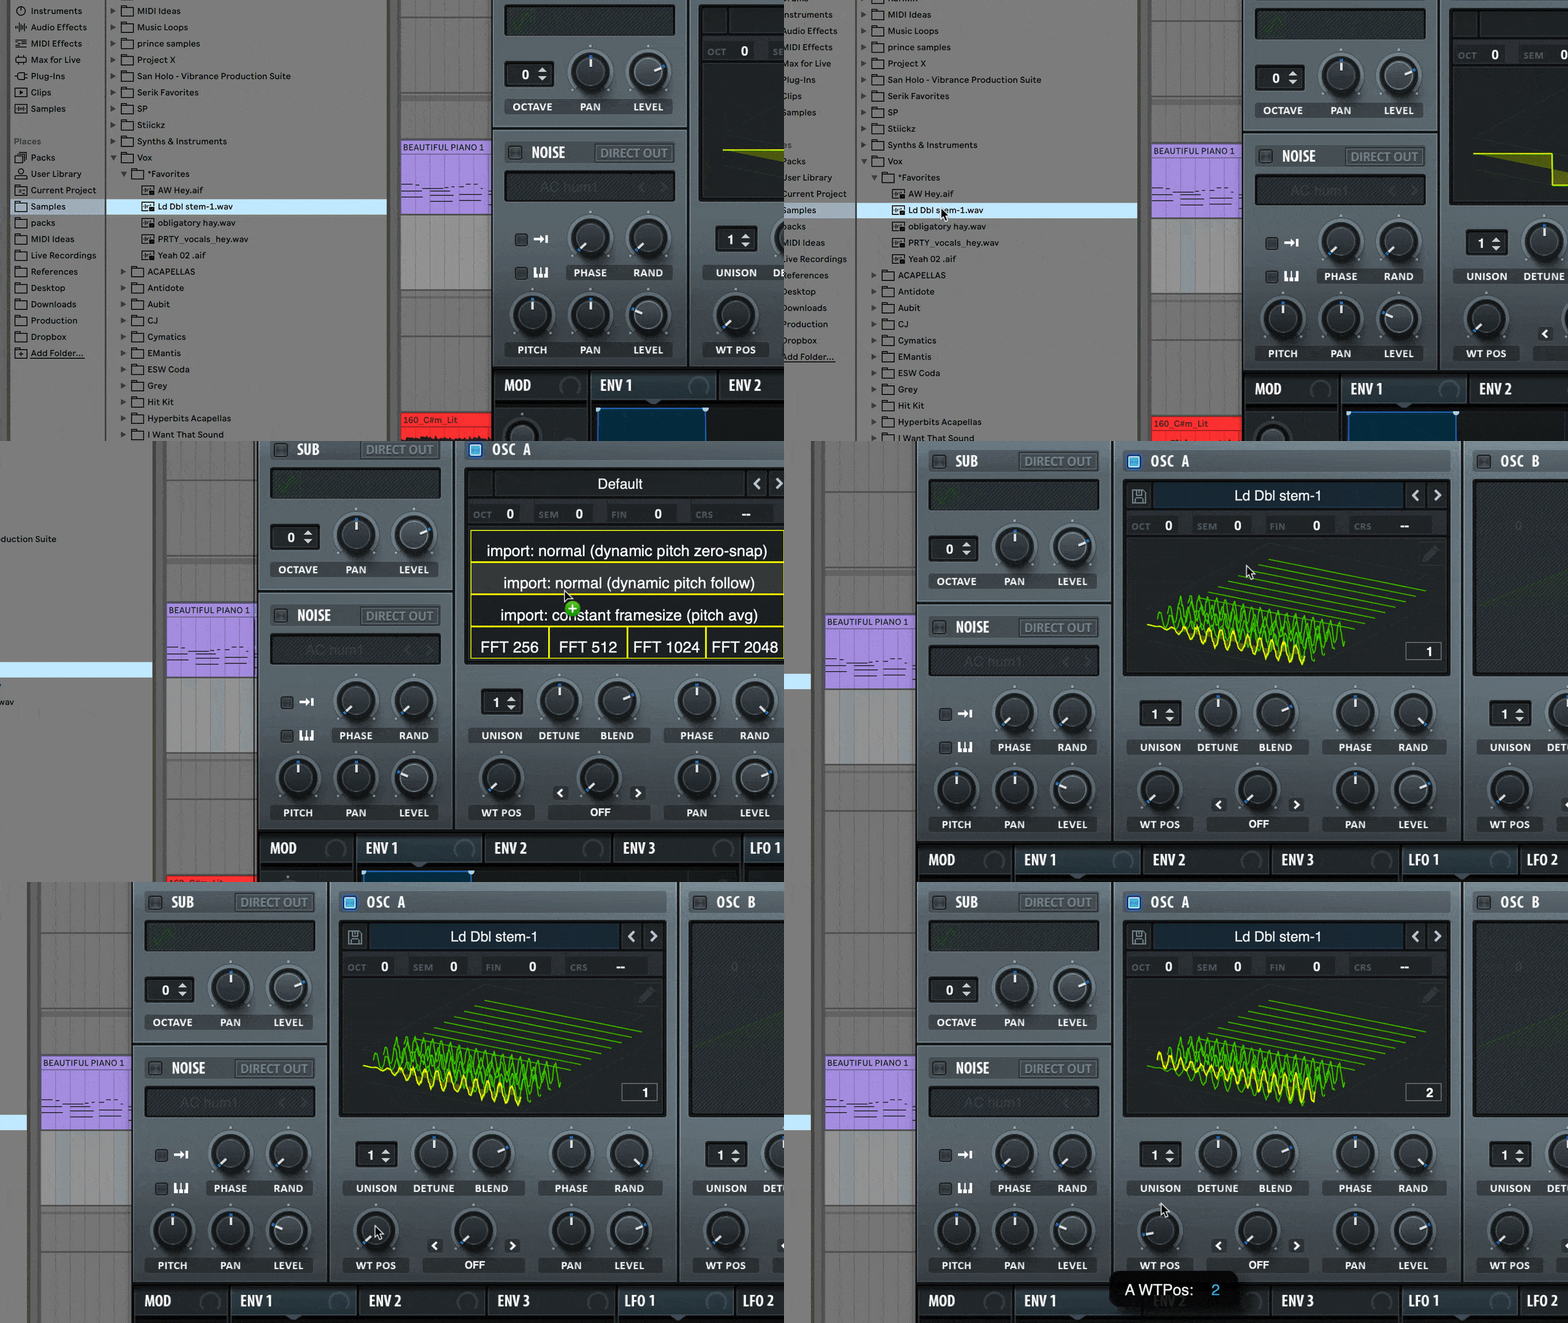
Possibly the coolest thing that separates Serum from many other synths is its ability to create custom wavetables by simply dragging and dropping audio.
This is more than a glorified sampler — it’s like having the power of Xfer’s Serum with ANY wav file you choose to drop into it.
Unlike a sampler that plays back through the audio as a single stream of data, when importing a sound into Serum, it attempts to slice the sound apart into the individual single-cycles.
Just think of the possibilities of what that means…
This means if you find Serum to have a very “digital” or “abrasive” sound, you can attempt to warm up the sounds and make them feel more analog by simply importing wavetables from analog synths.
In order to pull that off, simply record the waveform in another synth and drop the audio in Serum’s oscillator.
That said, if you’re overwhelmed, I’d recommend to simply use ‘import: normal (dynamic pitch zero-snap)’ for the most accurate representation of your audio, but of course, make sure to experiment with different settings.
5. Smooth Out Your Imported Wavetables
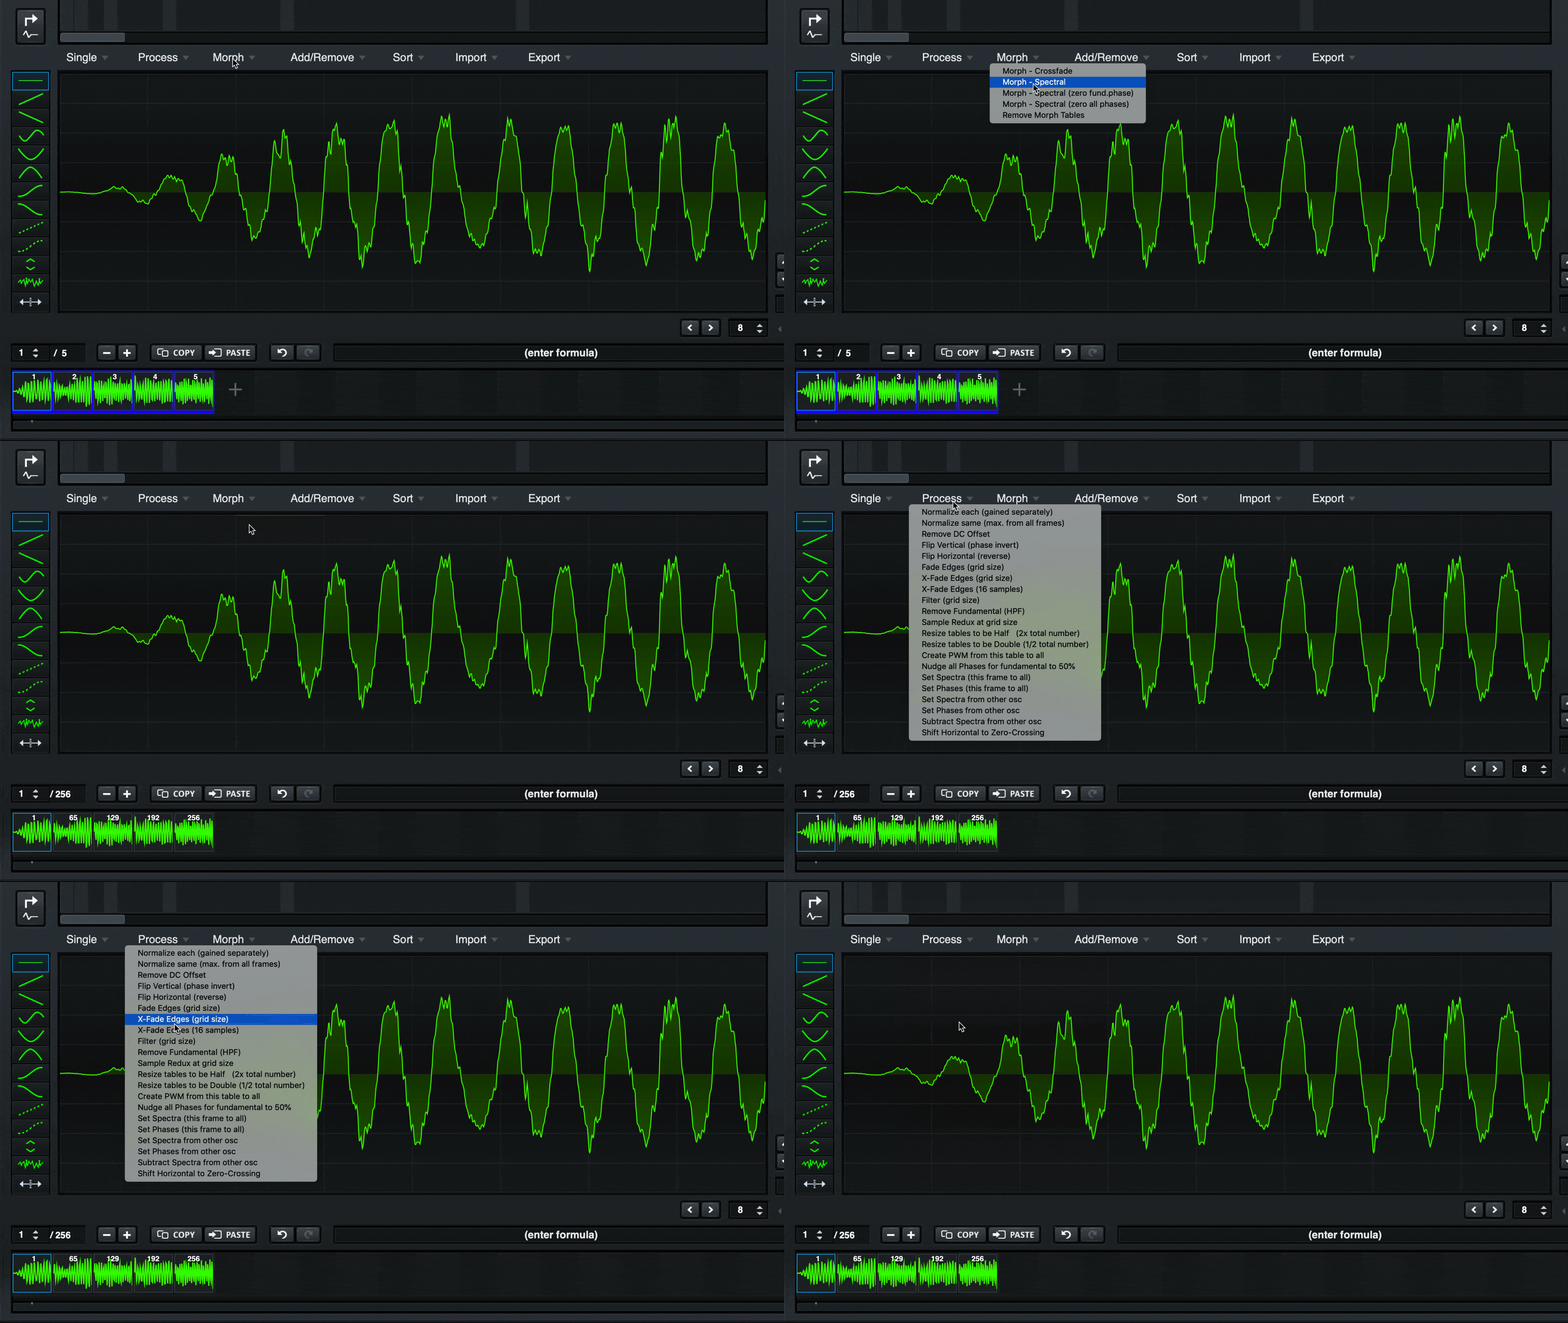
To piggyback off of our last Serum sound design tip, you can smooth out your imported wavetables by using Spectral Morph in the wavetable editor.
This allows you to smooth out frames of any imported wavetable and can result in a much more pleasing end result.
Also, try using X-Fade Edges to remove popping as you move from one frame to the next.
6. Use the Multiband Feature on The Compressor
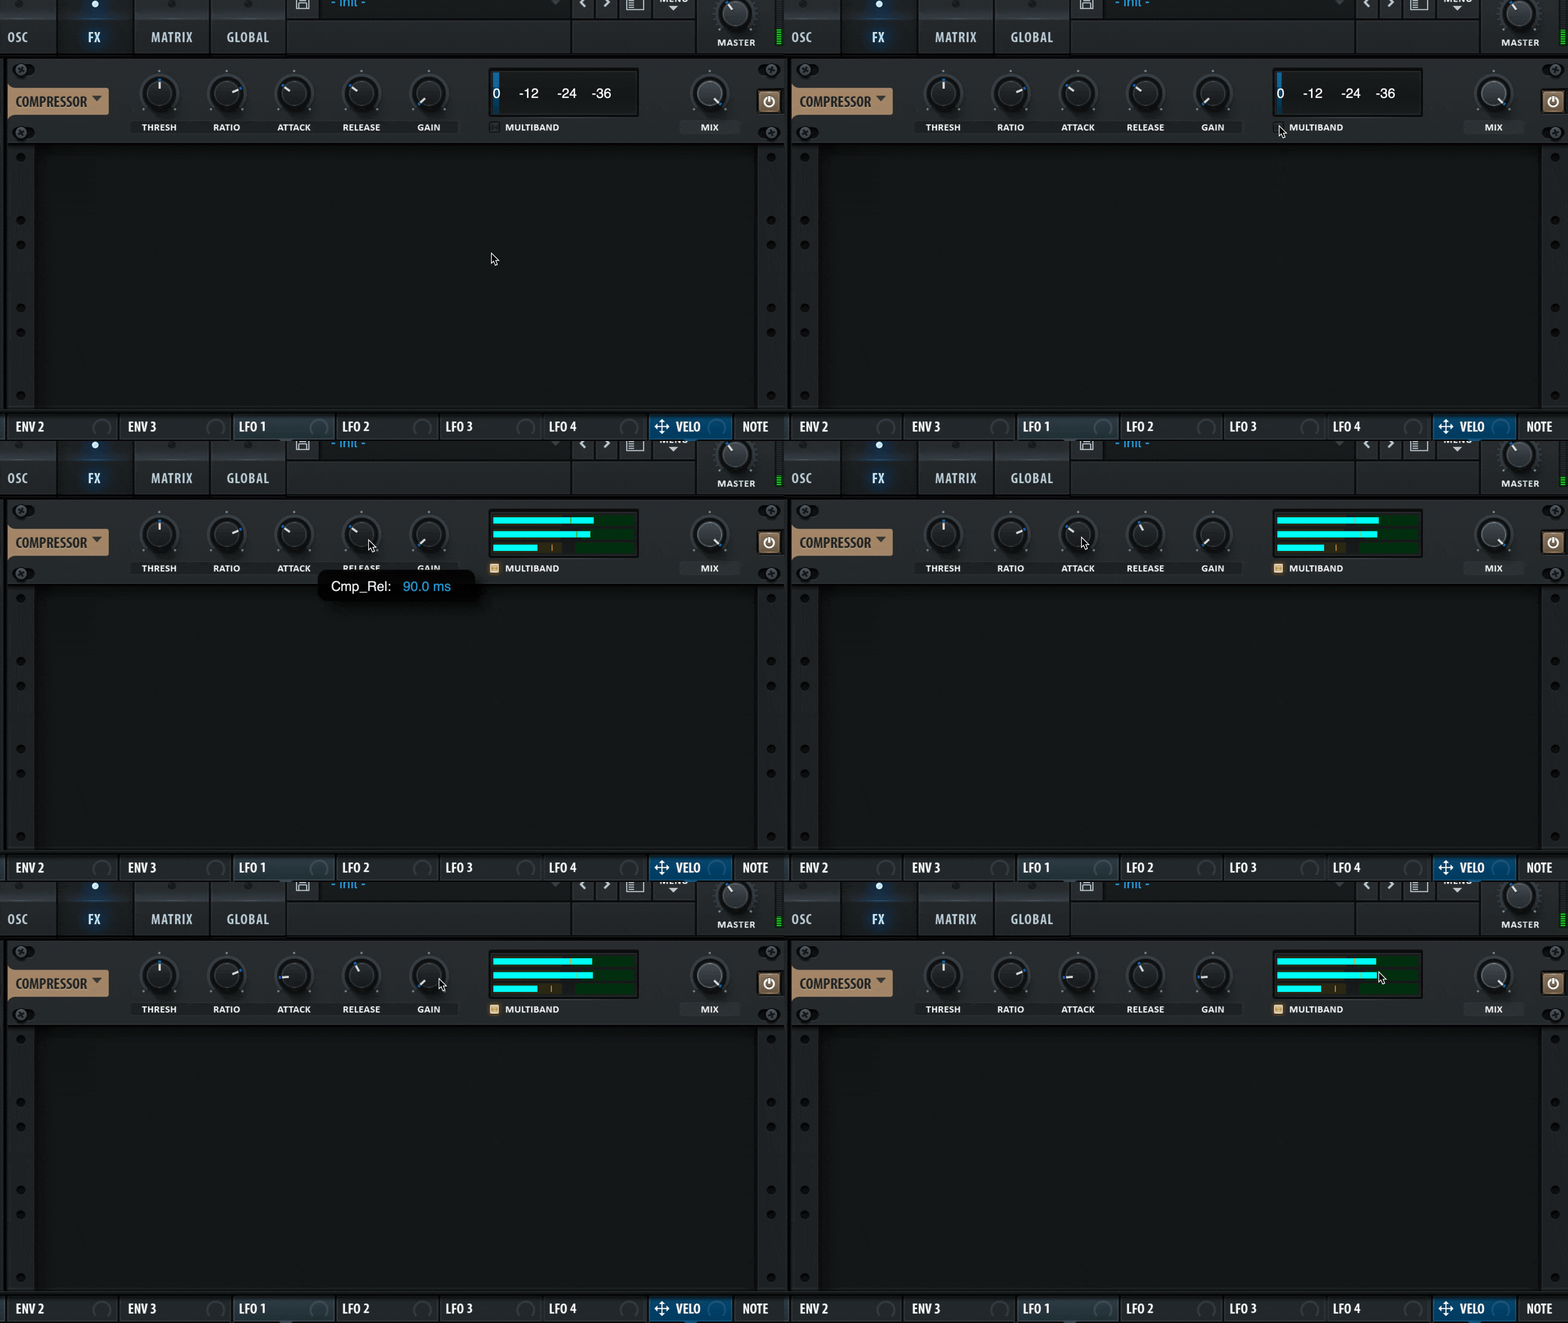
For those unaware, the multiband compressor inside of Serum is effectively the same exact thing as the stand-alone OTT compressor.
The multiband feature will instantly allow you to maximize the fullness of any sound, to a degree.
It will also allow you to shape the presence and body of the patch by adjusting the three frequency bands.
Pro Tip: Try experimenting with adding envelopes and LFOs to the different bands of the multiband compressor itself.
7. Reorder Your FX
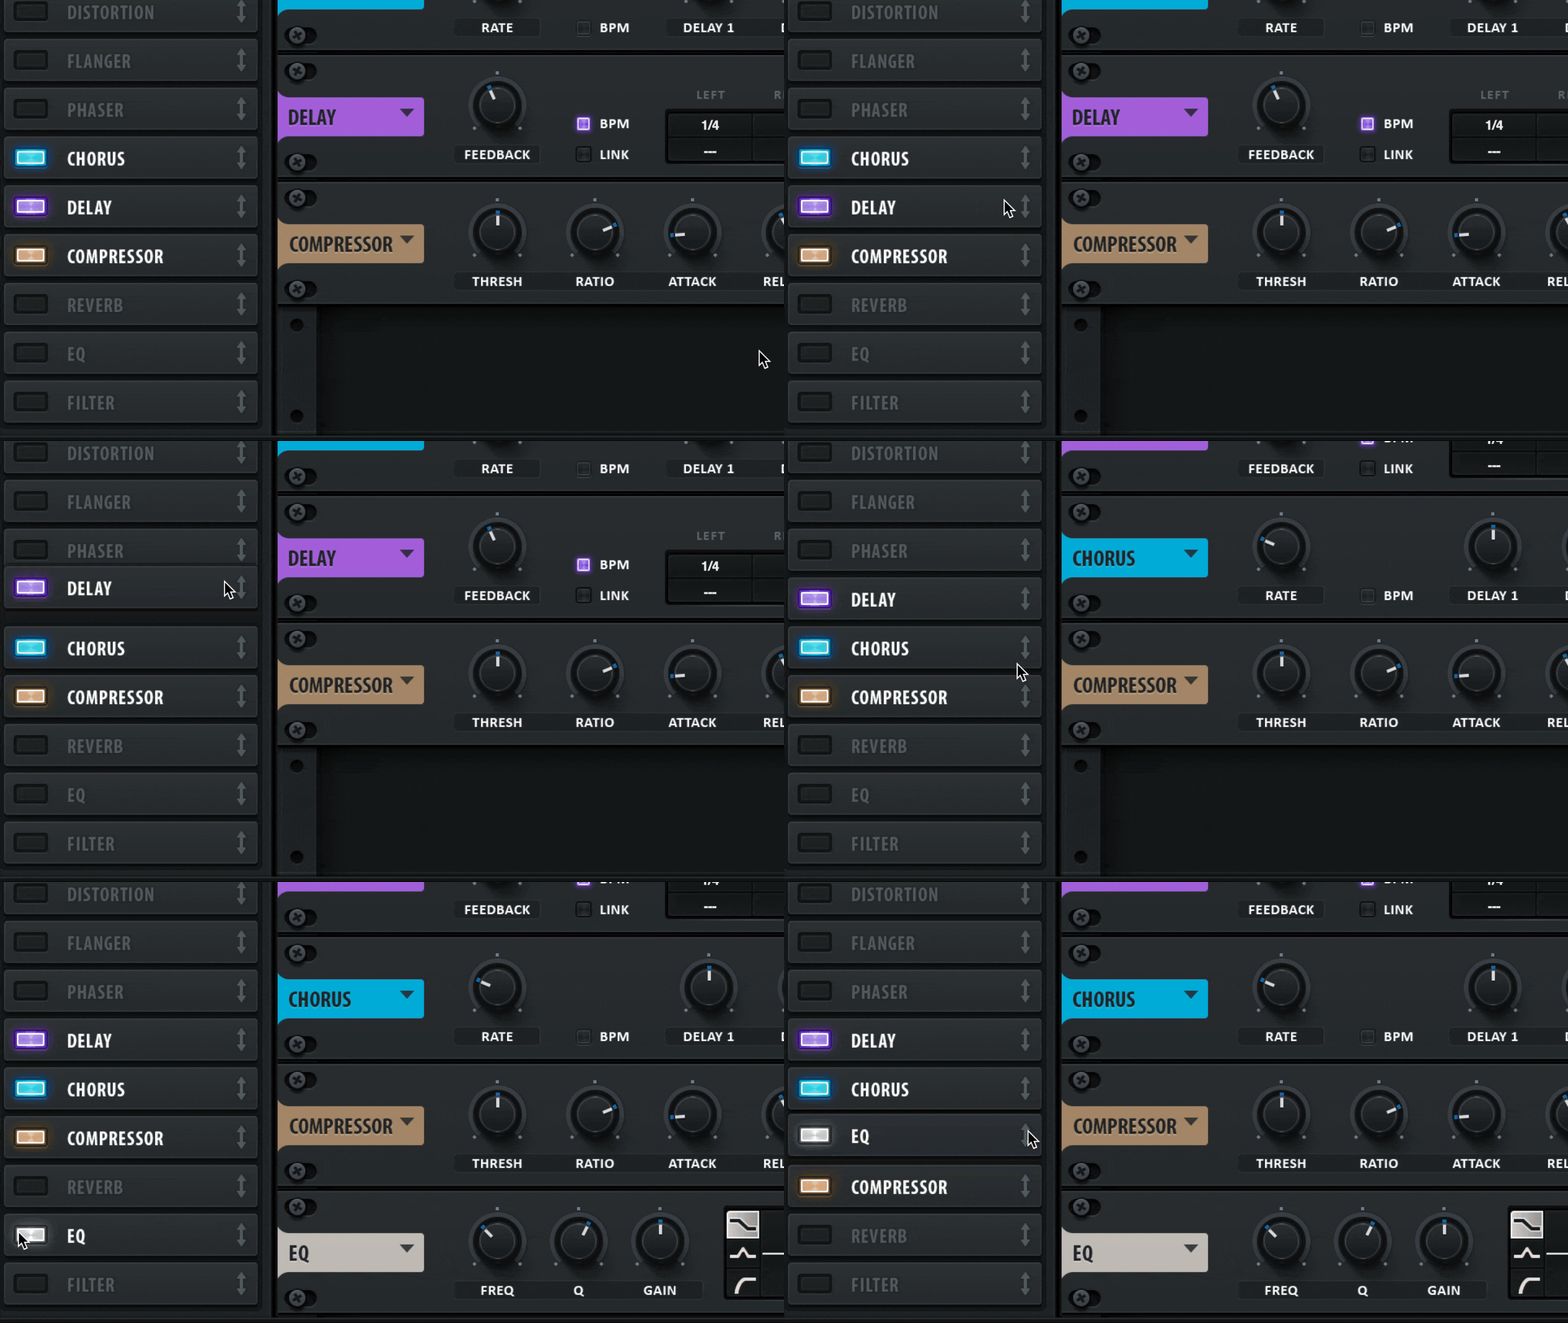
Like any processing chain, you can change the order of your FX processing chain inside of Serum to take advantage of every facet of sound design.
Playing with where you place special effects like reverb and delay can have an absolutely massive impact on your sound.
Pro tip: try moving the Multiband Compression after special effects like reverb to dramatize the effect that the reverb would normally have.
8. Conserve CPU with Oversampling
How’s this for a Serum tip?
When doing heavy sound design, you might run into CPU issues.
Of course, CPU issues are the bane of any serious producer’s existence because it slows down your workflow and leads to frustration or even boredom.
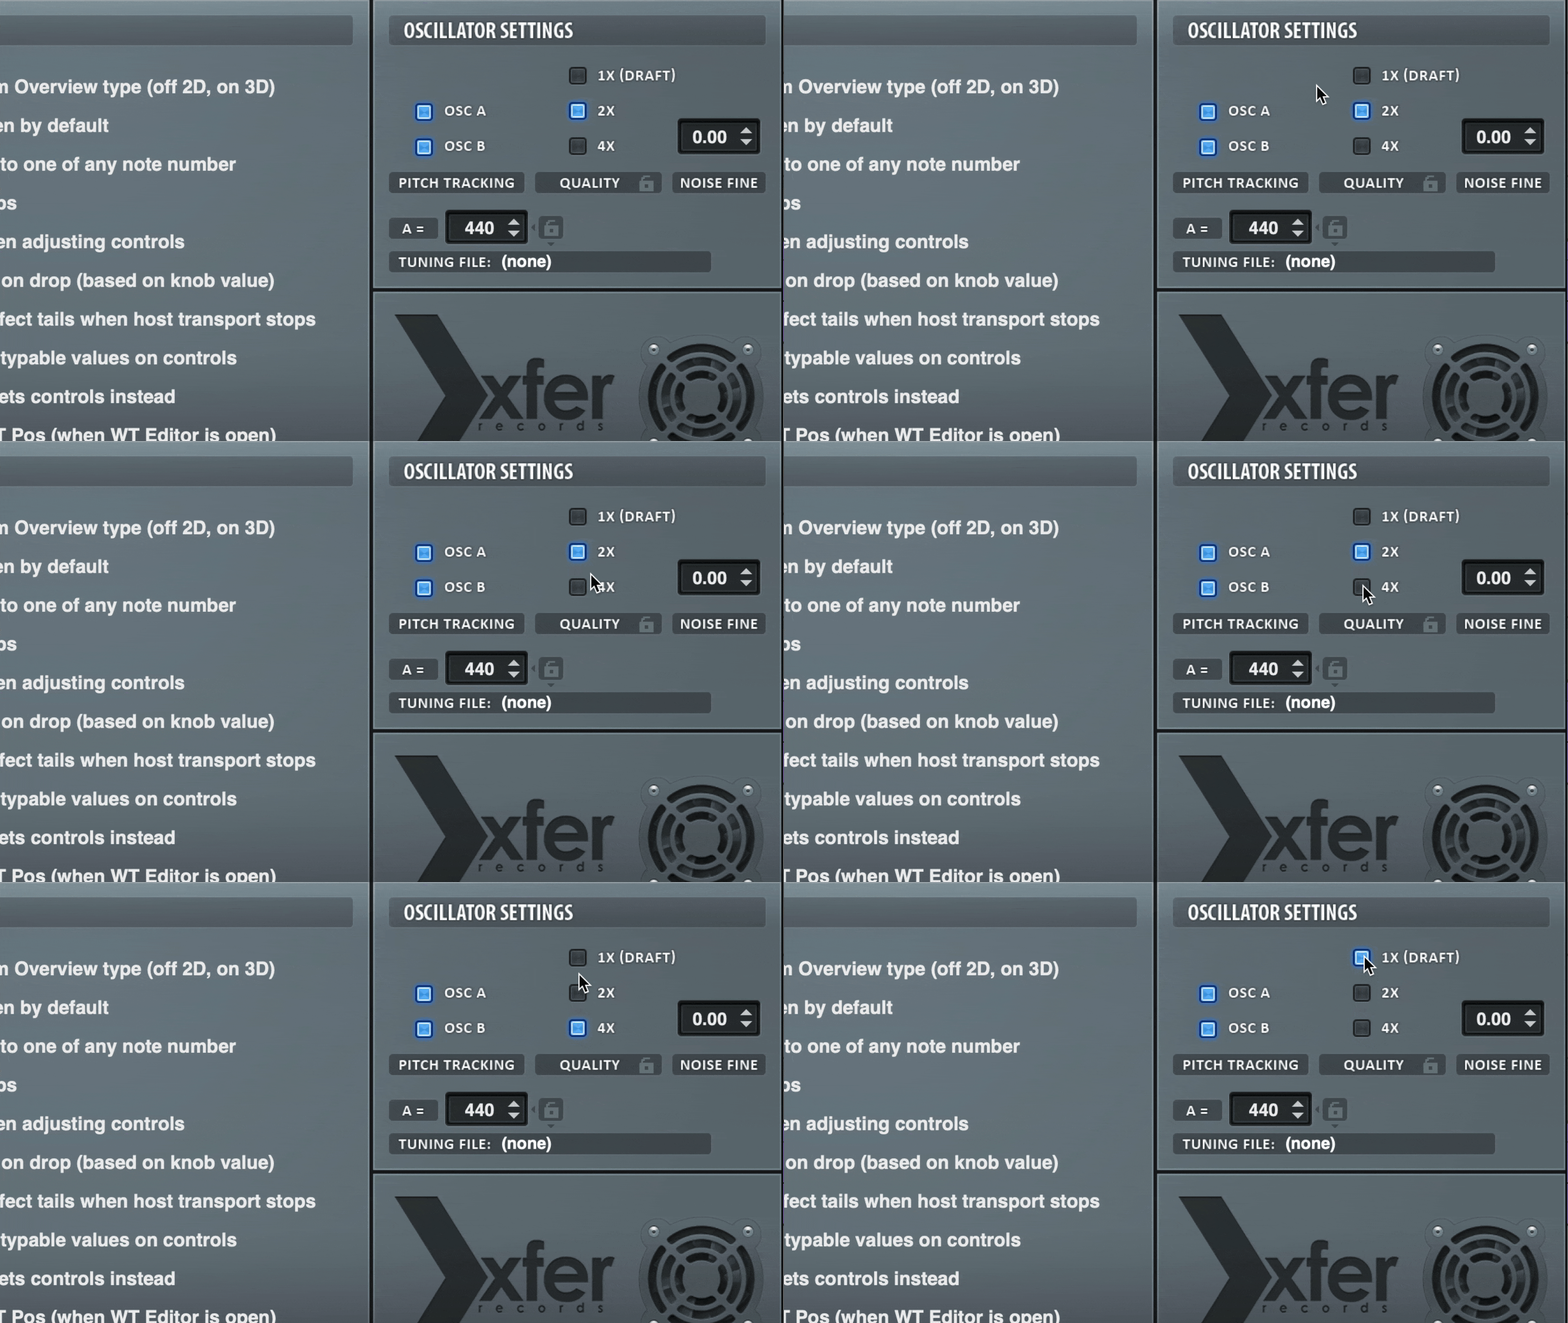
The solution? Use a lower oversampling rate to conserve processing power.
If you’re NOT concerned about CPU issues, you can achieve the best quality possible in Serum by selecting 4x oversampling. This is great when rendering a Serum patch.
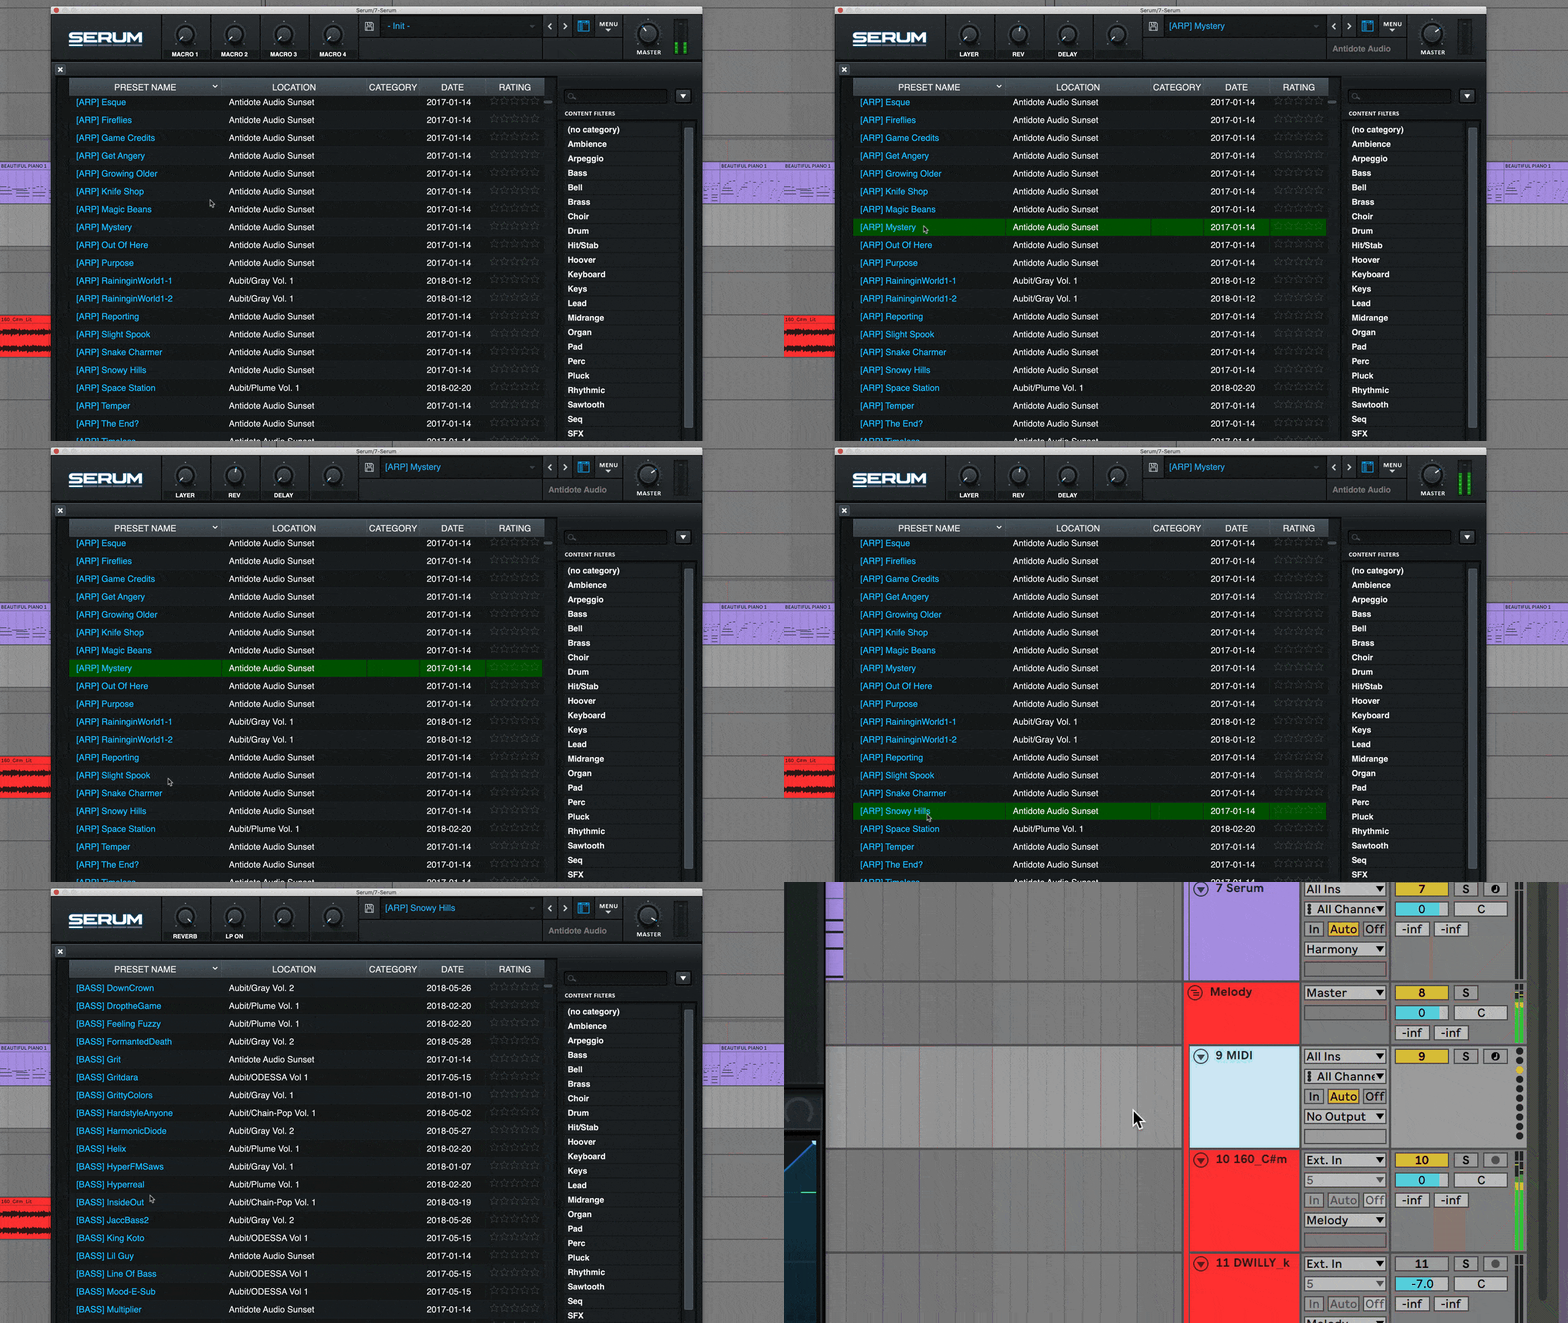
9. Use the Preset Browser
Simply put, using the preset browser to change presets is a fast alternative to changing presets.
Your patches will instantly change and make searching for the right sound much easier (rather than having to wait several seconds between each patch changing from the main preset dropdown menu).
You can even rate and star presets you like here for quick access later on.
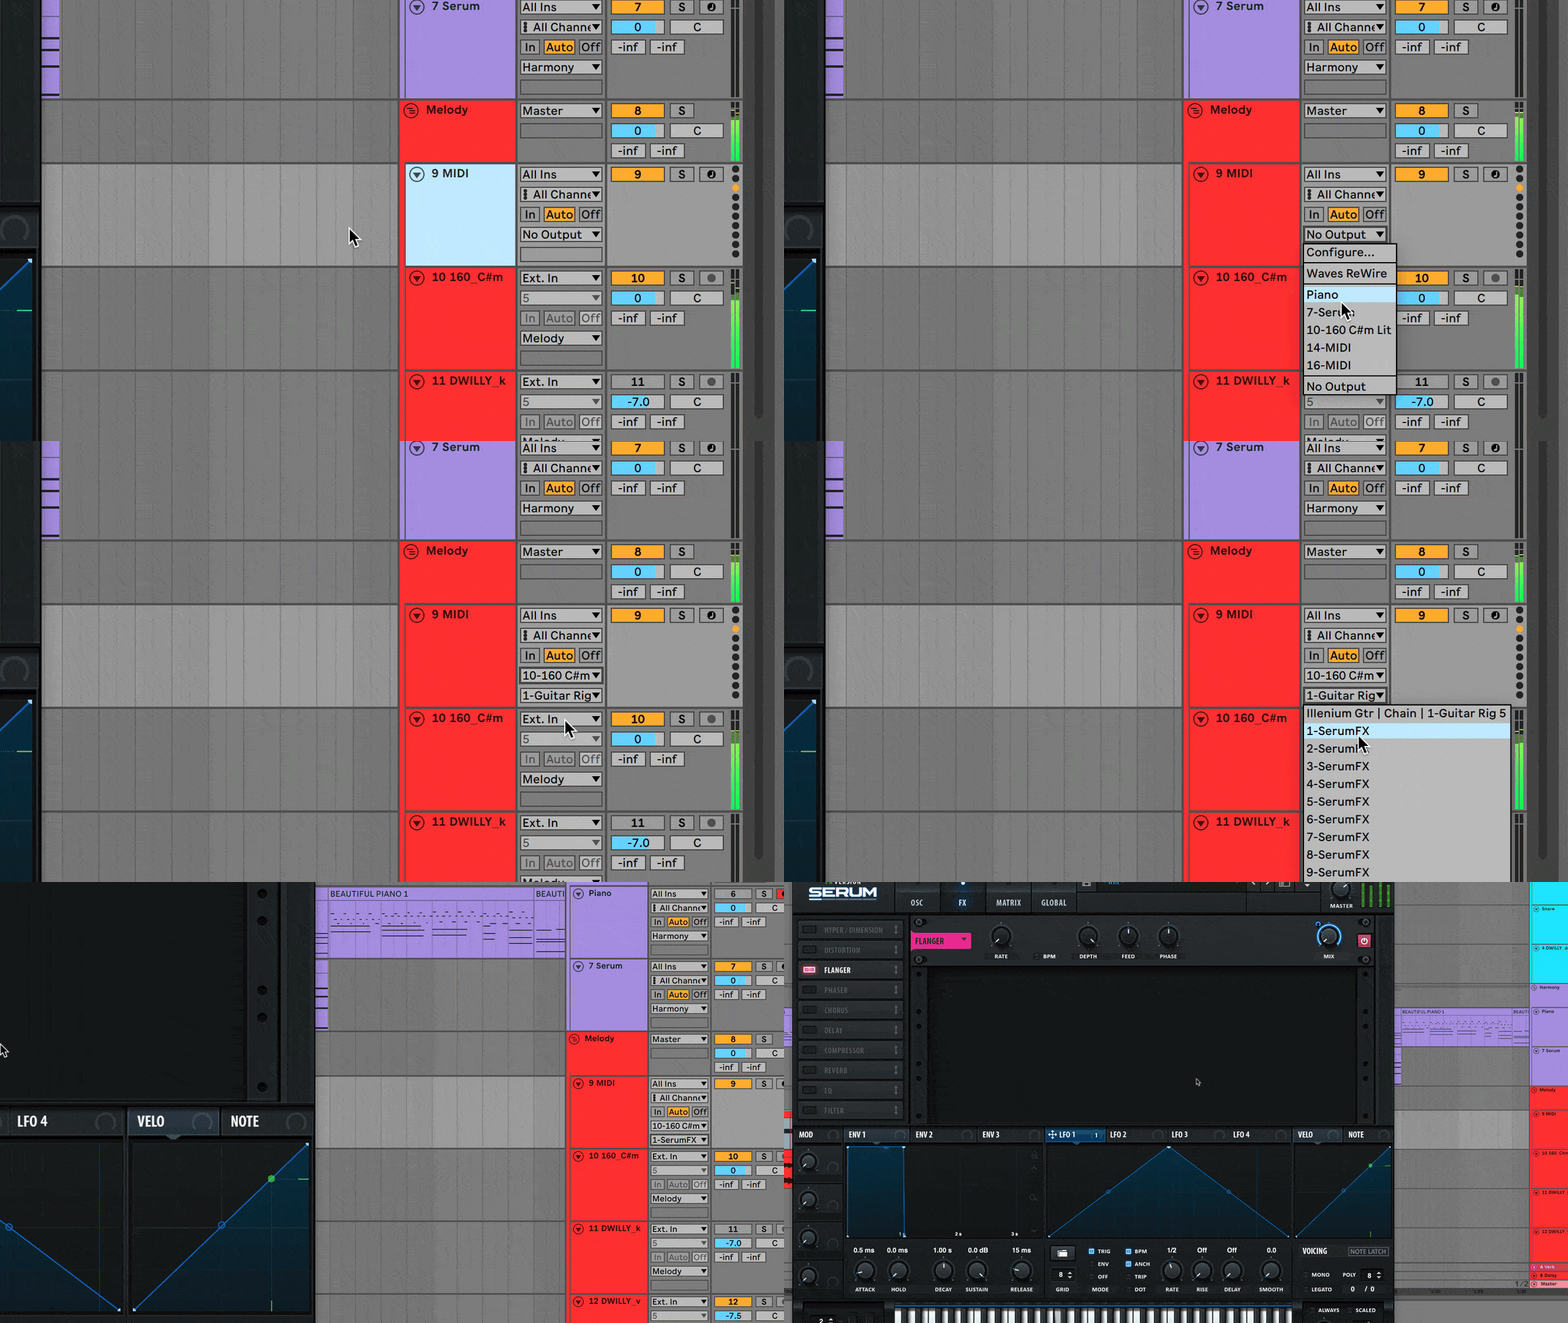
10. Serum FX Envelope Trigger
Ever wanted to use Serum FX on audio channels in your DAW?
Check this out...
Simply send MIDI to Serum FX on a separate channel to trigger the envelopes.
This will allow you to process your sounds further or use Serum FX on other synths as well.
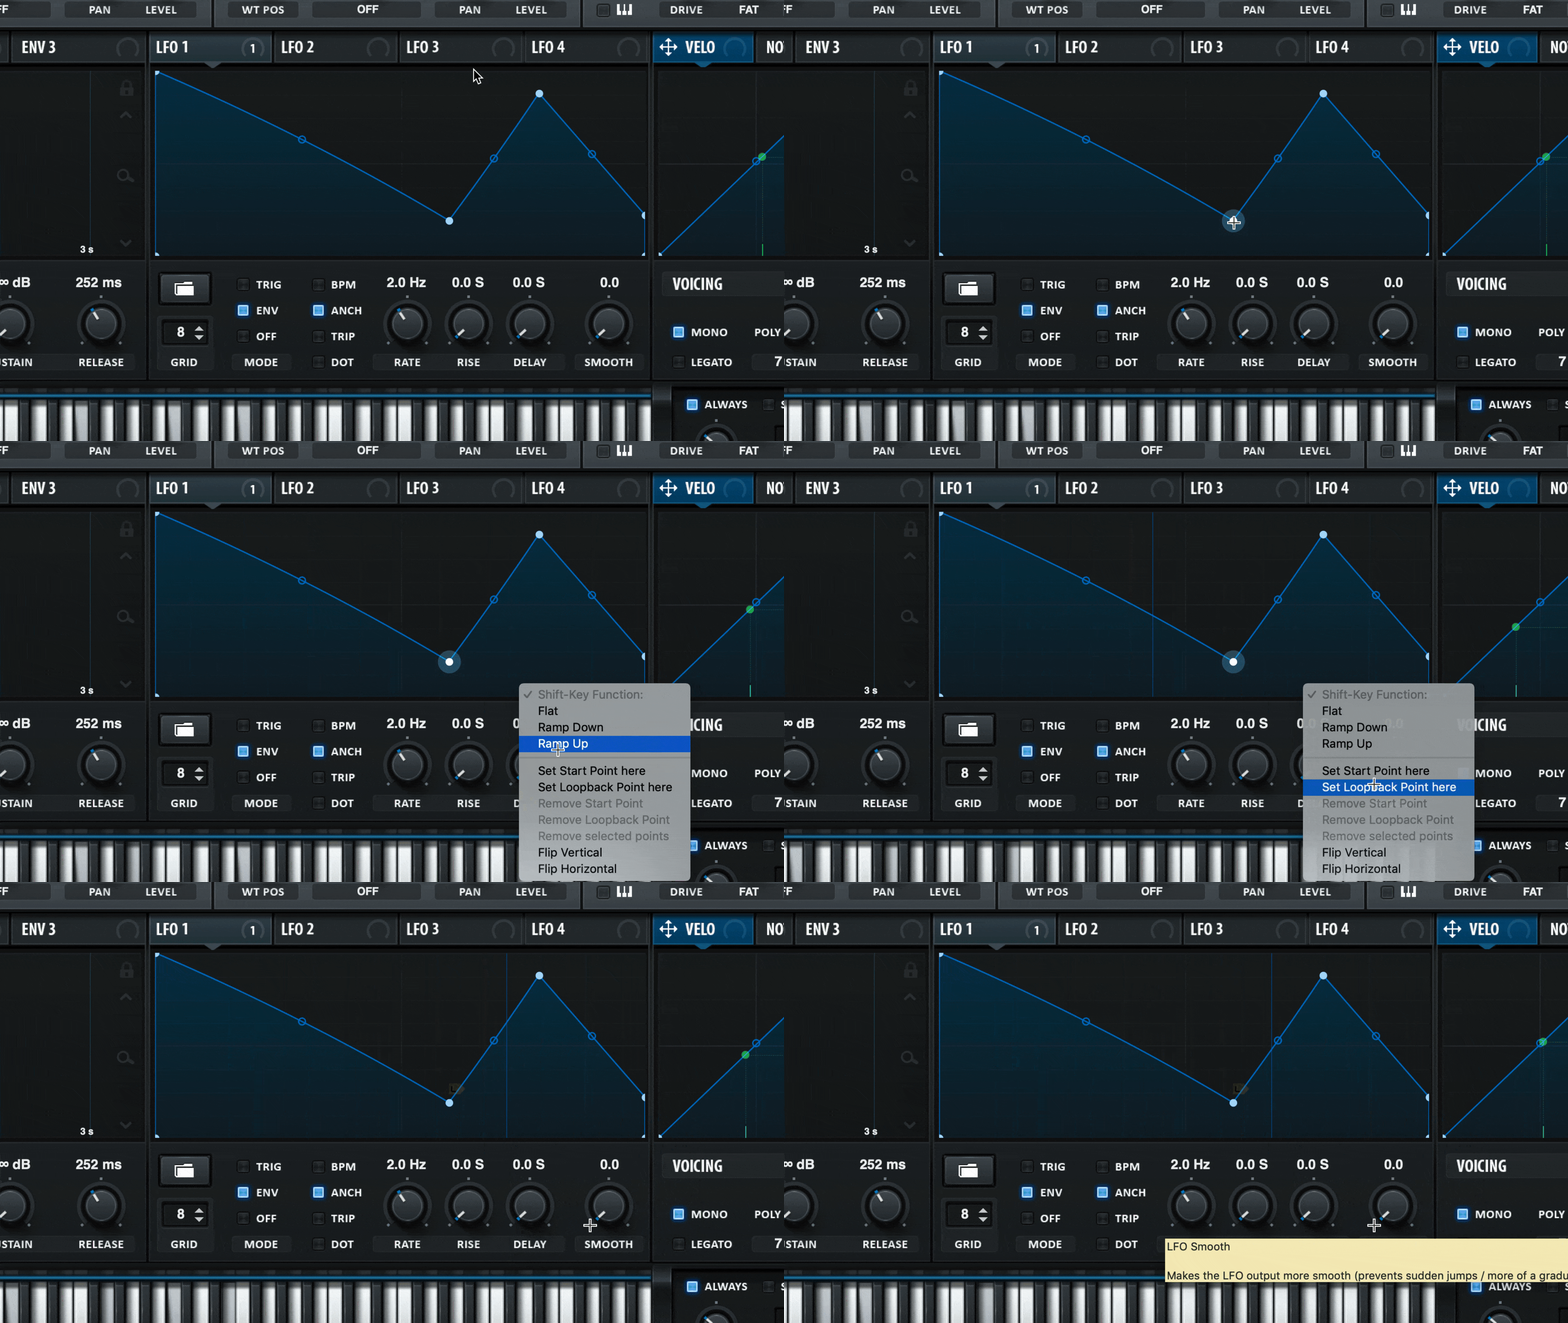
11. Loop LFOs In Envelope Mode
If you’re trying to sound like a professor when using Serum, we might have your favorite tip for you.
When you are using or manipulating an LFO in envelope mode, simply press Shift+Command+Click (for Mac users) or Shift+Ctrl+Click (for PC users) to create a loop point. From there, it will continuously loop.
You can even click on a pre-existing curve node to turn it into a “Loop” point.
When this happens, there will be a grey letter “L” that will appear over the node to indicate that it is a looping point.
Envelope mode allows us to just have the LFO play once and not loop, so looping LFOs allows you to create advanced looping LFO sequences and shapes.
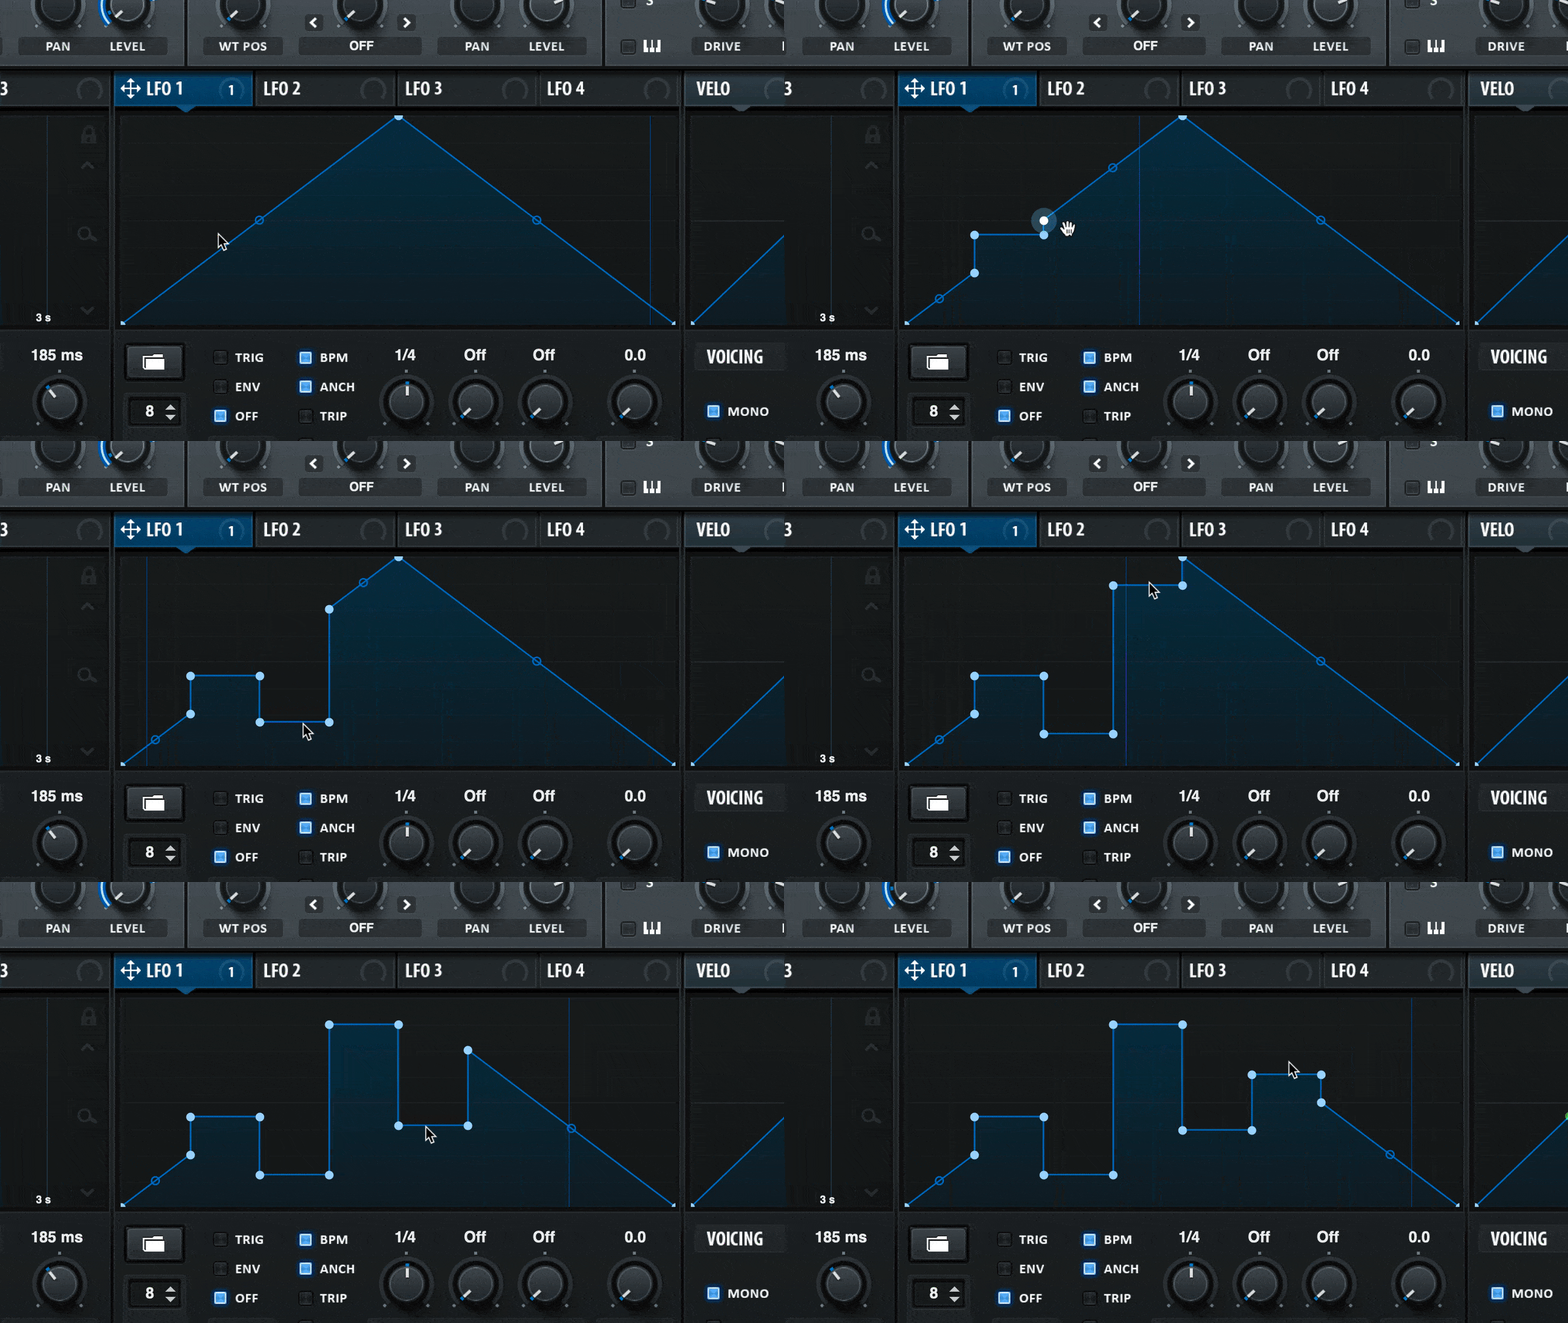
12. Turning LFOs Into Step Sequences
Did you know you can use Serum’s LFOs as step sequences or step patterns?
To do that, create a few points in your LFO, and then hold shift, and start manipulating the existing points. When you do this, the curves will change to flat lines.
Here is a quick tutorial from ADSR sounds that demonstrates this perfectly:
From there, you can drag and then modulate the LFO into your semi-pitch parameter (use + or - 12 or 24 semitones to stay in key).
Now you can hold down one note and get a fully functional arpeggiation.
Final Thoughts: Sound Design with Xfer’s Serum
Sound design can often be overwhelming and difficult to grasp.
We recommend learning with Serum because the possibilities are endless, but it is also very intuitive and user-friendly.
Hopefully, these 12 sound design tips will get you going in the right direction and help you eventually conquer advanced production and synthesis with Xfer’s Serum.
When in doubt, reference the Serum manual — you can download it here entirely for free.
When learning a synth, I like to keep the manual on my desktop so I can consistently reference it when needed, until I know it like the back of my hand.


