
Jump to a section5
Music producers rely on drum programming to sequence out rhythmic patterns. Drum programming was necessitated by the rise in drum machines’ popularity, replacing human drummers with electronic devices with near-perfect rhythm.
The human brain is designed to embrace rhythms. So being skilled at drum programming can make or break a track on even a subconscious level. Studies have shown that early humans were driven to mimic rhythms to achieve cohesion and build trust within their group. Simply put, humans have long been hardwired to love a good beat.
What separates basic drum programming from outstanding drum programming is all in the details. A generic house pattern on an 808 machine will sound rigid and sterile.
But affecting the same loop’s syncopation, envelopes. And timing can make the pattern come alive with momentum, swing, and a ton of danceability.
Basic of Drum Programming
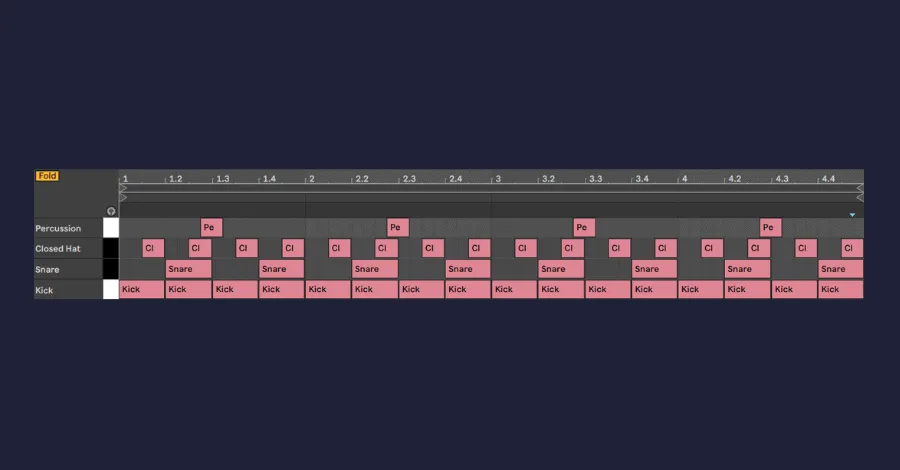
There is much to gain by looking at drums from the most basic level. Drums are the rhythmic backbone of any composition. And a producer cannot move into the intricacies of complex drum programming until a basic foundation is established. So with that in mind, let’s examine how each part of a conventional drum kit works together to create a standard groove.
Kick: The bass drum acts as the rhythmic anchor for most genres of house music. As such, the kick drum will be the most rigid and “on-grid” of all the percussive elements and yet is the defining aspect of a track’s sonic characteristics, style, mix, and genre.
Backbeat: Usually performed from a clap or snare sample, the backbeat is the first hint of syncopation within the drum pattern and helps define the groove’s energy and momentum. We will discuss in detail later on how to manipulate this energy to create human-sounding drum patterns all in your DAW.
Cymbals: These percussions fill the upper register of the harmonic spectrum and bring momentum with offbeat hats and energy through ride cymbals and crashes. Shakers and tambourines can also fall into this category and add texture and swing to a conventional groove.
Secondary Percussions: The rest of the percussions bring texture, layers, syncopation, and other complexities to the drum pattern. You get the most creative freedom with placement within your drum programming and sample selection. But be careful with the latter, as poorly selected samples will seem out of place, lack power, and are incohesive with the rest of the drum group.
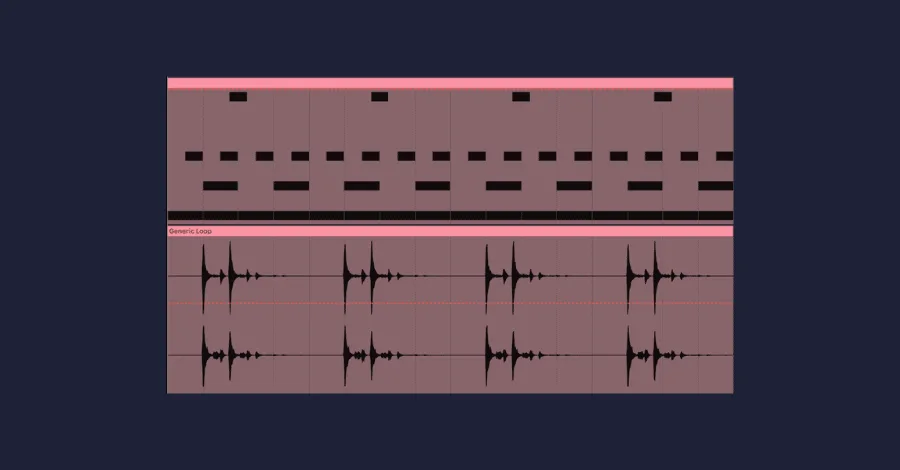
Pro Tip: There’s a weird stigma around using loops in a production. Don’t fall for it. Sampled loops are a legitimate tool for introducing complexity and humanizing early drum programming. If you’re refusing to use loops in the early stages, you’re hamstringing your own workflow.
How To Improve Your Drum Programming
Once you understand drum programming basics, you can start to expand upon these foundations by adding extra grooves, details. And subtle syncopation that can give your percussion the kind of feel that pulls a track from generic to genuinely produced.
Up until this point, our rhythmic foundation has been built upon conventional drum patterns. Now it’s time to think about some unconventional approaches that can really make this drum pattern stand out.
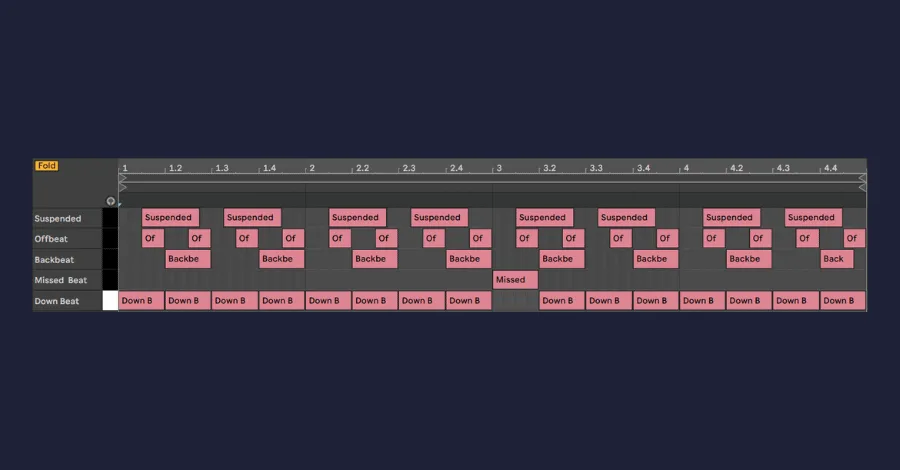
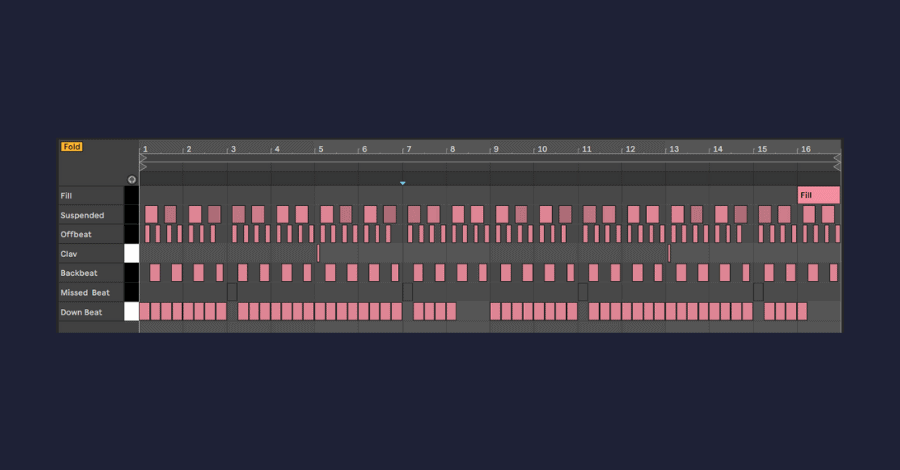
Syncopation: As discussed earlier, the backbeat is just one form of syncopation, but other forms will open up so many more creative possibilities. Here are the four most common forms of syncopation:
- Backbeat: Backbeat syncopation emphasizes the two and four beats instead of a measure’s conventional downbeats (usually the kick drum). Knowing how to manipulate backbeat syncopation can add energy, desirable laziness, and everything in-between to your drum programming.
- Offbeat: This syncopation begins to introduce percussive elements outside of the conventional pulse of the downbeats. Offbeat syncopation occurs most often in house music when the hi-hats are introduced, and the momentum begins to pick up.
- Suspension: This holds softer percussion across the stronger emphasis. These patterns can create an overlapping sequence and cascading effect within the percussion pattern by playing with rhythmic expectations.
- Missed Beat: This places emphasis in unexpected places, often creating off-kilter patterns that leave the listener anticipating hits that never come or arrive earlier than expected. This is common in the trap and future bass genres, where the kick drum is placed in unexpected places to create tension and anticipation.
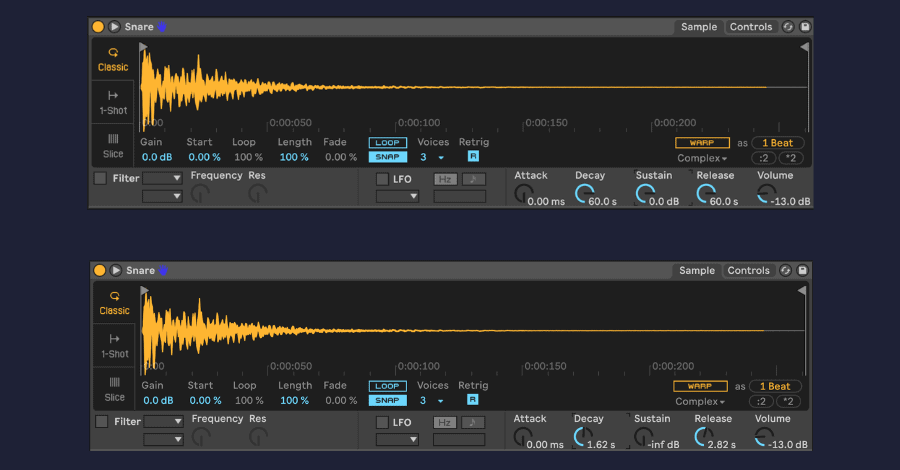
Drum Envelopes: Successful drum programming and groove development are as much about the space between the hits as it is the hits themselves. Just like most instruments rarely fit a mix without a touch of EQing and compression, very few drum samples will be absolutely perfect for the groove without a bit of tweaking.
Longer percussion can drag a groove down, making it appear more detached and lazier than intended. But this is where the magic of samplers come in. Playing with the ADSR envelopes of the individual hits can tighten up a groove and create valuable space within the drum arrangement.
This approach’s benefits are twofold, as more headroom is created when fewer samples overlap each other. This not only leads to a tighter groove but a louder and more confident one.
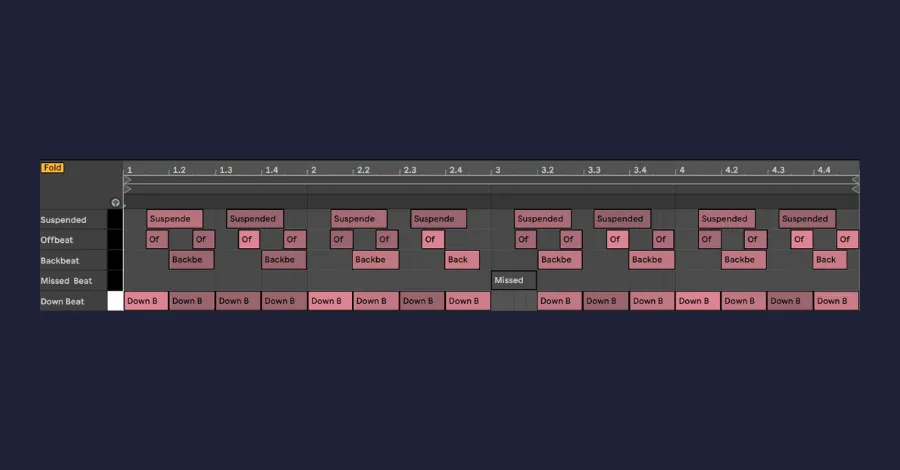
Starting to Look at Humanization: Two truths are essential to keep in mind when humanizing computer-generated percussions. 1) Even the most proficient drummers in the world cannot play with perfect timing as a computer. 2) No two hits are ever EXACTLY the same.
Stock groove templates bundled within all popular DAWs can help introduce minute timing and velocity adjustments into your track and are great for beginners. But will only get you so far. The trick is to manually adjust choice elements of your drum programming to play just before or slightly after the quantized grid.
The former will introduce drive into the groove, where the latter will slow the groove down in a desirable way. This mimics what drummers refer to as “playing in the pocket.” Usually, the difference of only 2-10 milliseconds will do the trick either way.
Intermediate Uses for Drum Loops: Dropping in stock drum loops into your project is a great way to get a vibe going, but will never be unique nor perfect right out of the box.
Like everything else in the production, how you use these tools can be the difference between polished-sounding drum programming and the stale, static percussion of an amateur producer.
Be meticulous and scrupulous as you slice, arrange. And mangle these loops to fit into your project, and remember that just because a hit is in the loop does not mean it deserves to be in your track.
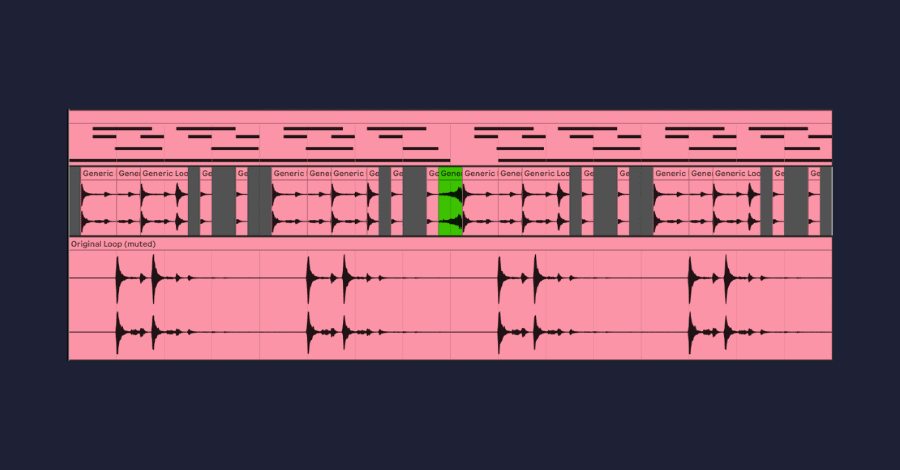
Pro Tip: If a single percussion loop supplies most of the groove in your drum programming, try extracting the groove from the audio clip. The stock groove templates in DAWs work just fine, but some audio loops have a swing character that is entirely unique and can yield excellent results.
Hooks within percussions: Who says that the melodics should have all the fun when establishing the central hook? Having a few percussive elements act as a rhythmic hook can add an extra layer of interest to your groove.
There are many ways to achieve this, but the three methods I find myself using most often are:
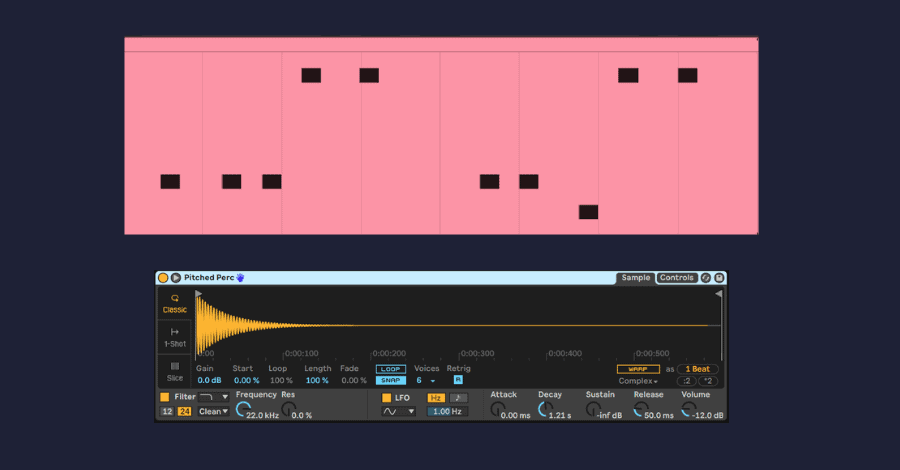
- Pitched Percussions: Some drums have a tonality that allows them to be shaped into a melodic progression. Making sure these are tuned to your track’s key will enable them to play simple riffs that can compliment the lead synth melodies.
- Call and Response: Rhythmic patterns can talk to each other, with one sequence posing a question-like pattern and another drum group echoing that phrase.
- Mirror Rhythms: Introducing another percussive layer that matches the rhythmic pattern and timing of your lead synth or supporting arpeggiator can give your track an extra push of energy without adding new elements.
These approaches are handy in genres like house and techno, where those on the dancefloor are paying more attention to the track’s beat than the elegant melodies unfolding on top of it.
Drum Programming For Experts
By the time producers reach a professional level, their ears are attuned to the minute details that even amateurs are oblivious to. But it is in these little sample modulation choices, unique time signatures, and arrangements that a programmed drum groove comes alive.

Sample modulation helps a drum sample that may sound great on its own keep that interest over many repetitions. Assigning LFOs to parameters such as a sample’s start point, volume, panning, or detune amount will keep each individual hit of the sample slightly different from those that came before it.
This replicates the idea that no drummer hits their instrument the exact same way twice.
A way to push this approach further is through round-robin sampling, which involves playing a percussive pattern while cycling through near-sounding samples. Pick an odd amount of samples dependent on your track’s time signature (5, 7, or 9 samples when composing in standard 4/4 time), and have your single pattern trigger different samples throughout the sequence.
Dance music is predictable by nature, and professional producers know the rules well enough to start breaking them. Playing with the conventional four or eight-bar loop cycles so commonly written in 4/4 time by implementing polymeters is one of the best ways to do it.
Polymeters occur when two different rhythms are played over the top of one another. A predictable 4/4 time signature can be overlapped by a three-bar loop to wondrous effects, which results in each loop cycling over each other at seemingly inconsistent times. Maybe an eight-bar kick pattern plays underneath a twelve-bar pattern of found sounds.
These styles of cascading rhythms keep the listener’s anticipation locked into your groove far longer than a conventional, static loop ever could.
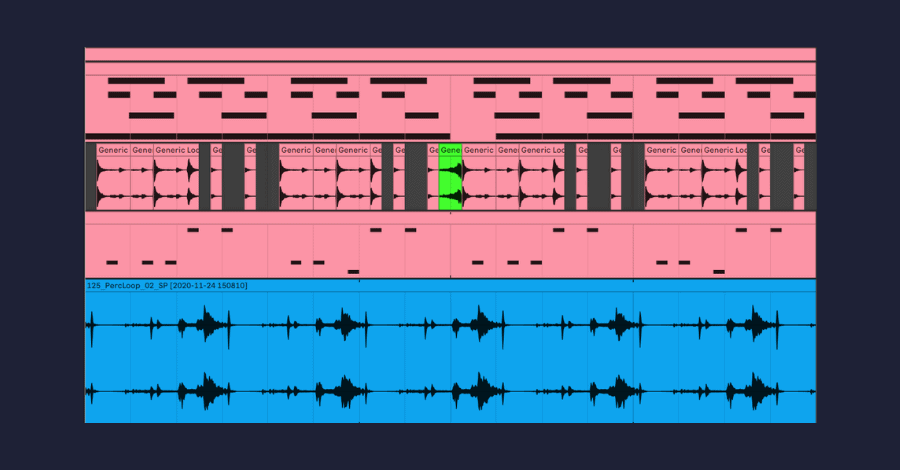
Varying time signatures are just one way to keep the loops you are using interesting. But there are other ways to look at arrangements that can help extend the interest in a programming drum loop. Professional producers are always looking for ways to expand their loops’ length beyond the conventional four or eight-bar patterns.
Look for places to apply incidental drum hits that only occur sporadically. Drum fills at the end of every 16 bars are the most obvious. But smaller and more delicate samples work just as effectively for keeping your drum programming dynamic and exciting. Perhaps a tonal percussion plays in the 5th bar of your eight-bar loop, or a few kicks are removed from the 9th bar of a 16-bar pattern.
Subtle arrangement tricks play with a listener’s expectations. When done right, they help create infectious drum grooves that feel as exciting as they do humanized.
Pro Tip: Whenever possible, avoid rigid transitions at predictable moments. It all comes down to blurring the boundaries between sections to create surprising and impactful moments.
Working With Drum Samples
Even once your drum programming reaches a professional level, it will still fall flat if the sounds you are using don’t measure up. Be mindful of the following tips when collecting, arranging, and shaping your drums.
Sample Selection: Just because a drum sample slaps on its own doesn’t mean that it will sound great in conjunction with your other samples, and a proper mixdown can only do so much. The drum samples MUST sound like they belong together, or the discontinuity can throw off listeners.
It can be tempting to go with what works in the moment. But spending the extra time choosing the exact perfect sample will pay off dividends in the end.
Need more drum samples? Here are some favorite free libraries:
If you want to go beyond sample packs entirely, sampling kicks straight from your favorite tracks is one of the most underrated techniques out there.
To learn more about this technique, check out our full guide on sampling kick drums from any song.
Here’s Serik walking through exactly how to pull a kick from any track in your library and make it work in your production. It’s easier than you think.
Contrasting Percussions: Consider the contrast in your sound selection. Select some softer samples that support the groove and some samples with more robust transients that genuinely pop out of the speakers. Often these latter samples can be pulled from sample packs outside of your genre, so if you’re a techno producer, don’t shy away from using a punchy hi-hat just because it comes from a dubstep pack!
Drum Tuning: While drums are technically considered an inharmonic instrument, many do hold a fundamental pitch. Most samplers allow for easy adjustments of sample pitch, so be mindful of dissonant drums that could throw off your groove. Conversely, adjusting the tuning is a great way to implement the call/response technique outlined earlier.
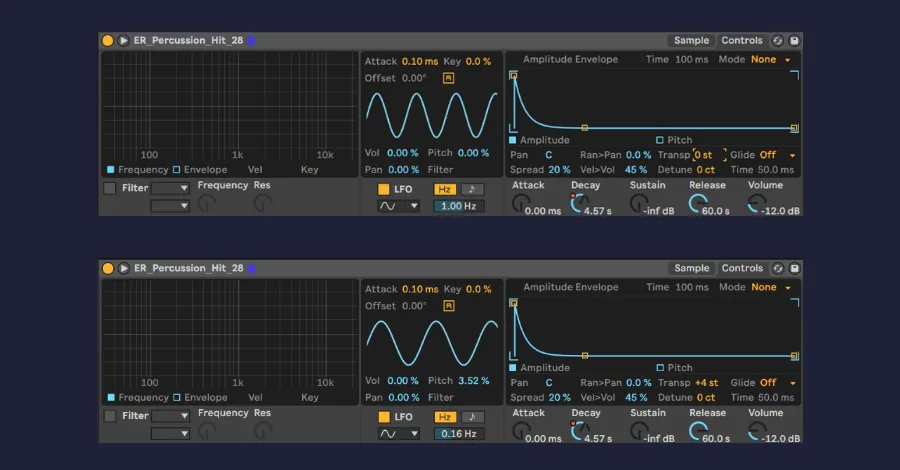
Pro Tip: Remember that adjusting the pitch will likely affect the length of the sample unless you have the warping settings turned on. This means that lower-pitched percussions slow down the groove both with frequency content and groove timing.
Arrangement: The mark of an amateur producer is showing their hand too early through their arrangement. A good arrangement waits until the very last moment before introducing a new element. Remember that massive synths and open filters are not the only way to achieve an emotional payoff in your final drop.
Saving one last layer of rhythm or a high-energy hit until the very final section can be enough to lift a good groove into a phenomenal one.
The Details Make the Difference
Too many producers don’t give the time and attention to the culmination of the hundreds of small variations and decisions needed to program unique drum patterns. Don’t be scared to go down the rabbit hole of tiny, seemingly inconsequential adjustments.
It is these that make all the difference.
While the technical side of drum programming can be learned and studied, other parts simply take time. You cannot read about the feeling a good groove gives you when it’s dialed in just right. And it’s impossible to know how samples sound together only by listening to your favorite artists.
It takes time and legwork to get your ears attuned to these subtle differences. The Hyperbits Masterclass is perfect for those who are wanting to conquer music production. I won’t lie. Music production is FREAKING HARD, which is why we spare no expense as we cover every detail of making polished-sounding music.