
Jump to a section10
- 1Adding Distortion with Native Instruments Guitar Rig
- 2Creating Next-Level Reverbs and Delays with Guitar Rig
- 3Adding Body to Sounds Using the Pitch Pedal in Guitar Rig
- Hold Up. Why Do We Keep Using Sends?
- 4Using Logic’s Pedalboard for Small Distortions and Unique Modulations
- 5Waves Guitar Amp
- 6Using an Amp Before a Reverb Plugin for Bright, Crunchy Reverbs
- 7Inserting Guitar Rig onto Your Channel
- 8DIY Hardware for Totally Unique Distortions
- The Sound Is in the Imperfection
Our go-to guitar amp software is Native Instruments Guitar Rig, which lets you build a full chain of amps and effects inside one plugin. Logic users already have Pedalboard built in, and Waves GTR Amp nails bright, clean amp tones. Our favorite way to use any of them: on a send, mixed lightly under your dry signal.
Famous guitarists from Steve Vai to Kirk Hammett to Eric Clapton to Jimmy Page were well known for their obsession with tone and timbre. Pairing guitars with amps and pedals, these artists chased a sound that resonated warmth, depth and originality, creating some of the most memorable and huge music of the past half-century.
Kirk Hammett, lead guitarist of Metallica, has openly talked about his experiments with tone in his career, often having to keep in-depth journals to remember exactly what effects he was pairing with which guitars.
Today, we’ve got things a lot easier. Software emulations of amps and pedals are readily available for all of us, and once we find them, we can save them as presets. We can use them to bring that same life and originality to the tracks we make directly on our computer.
Here are 8 creative ways to use guitar amp plugins to add analogue warmth or crunch to your tracks.
1. Adding Distortion with Native Instruments Guitar Rig
Native Instruments Guitar Rig is a deep plugin that houses 17 amps, 27 cabinets, and 54 effects. You can use several of them at once with a single use of Guitar Rig and arrange your own signal chain within the plugin.
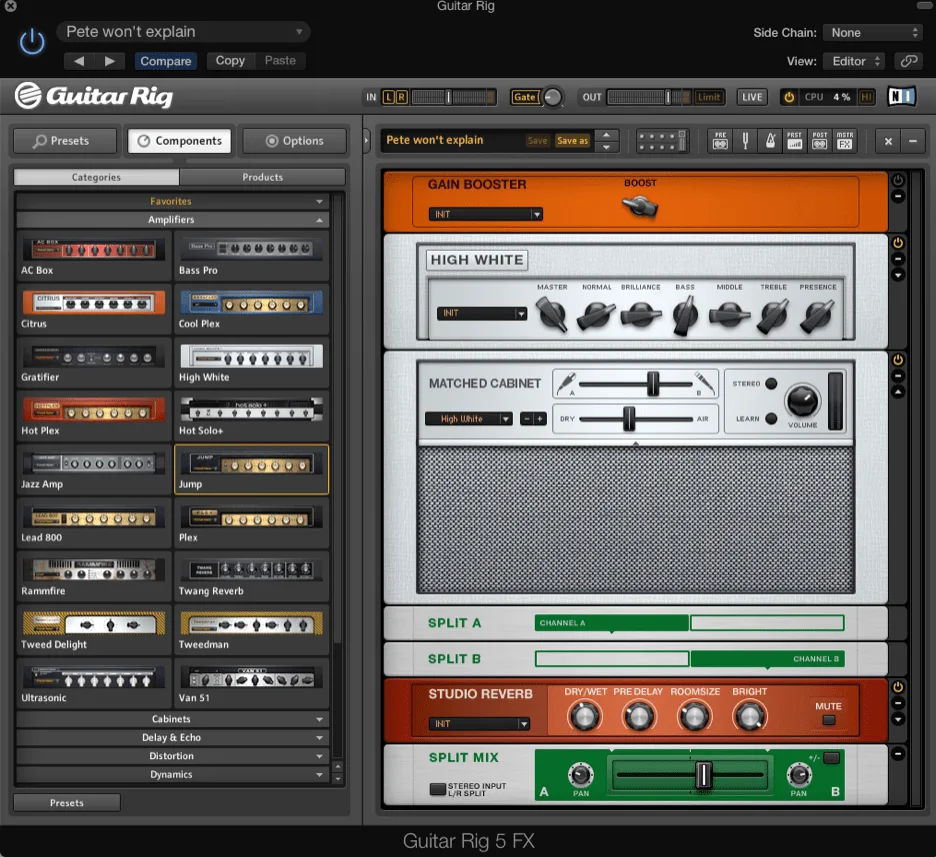
The distortion plugins are particularly useful. Set up a Send channel from the sound you want to distort and put Guitar Rig on the send, use just a little bit of volume in the send channel to get a warm, crunchy distortion to then mix in lightly with your dry signal.
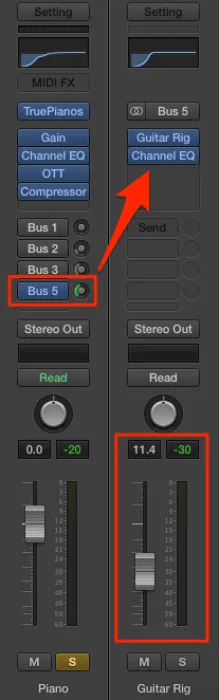
Again, note that only a little bit of volume on Guitar Rig is used. Within Guitar Rig, go to the Components section and choose a distortion plugin (Fuzz is a favorite, but several are great).
Also, make sure both L and R are enabled so you get your distorted signal in stereo. This technique can be used on any sound that we might deem needs more weight, fatness or warmth.
To learn more about fattening up your mix with saturation, check out our Top 20 Saturation and Distortion Plugins for Electronic Music.
By introducing a guitar amp emulation, we are essentially just bringing in additional imperfections to make our source sound appear more analogue (the opposite of digital).
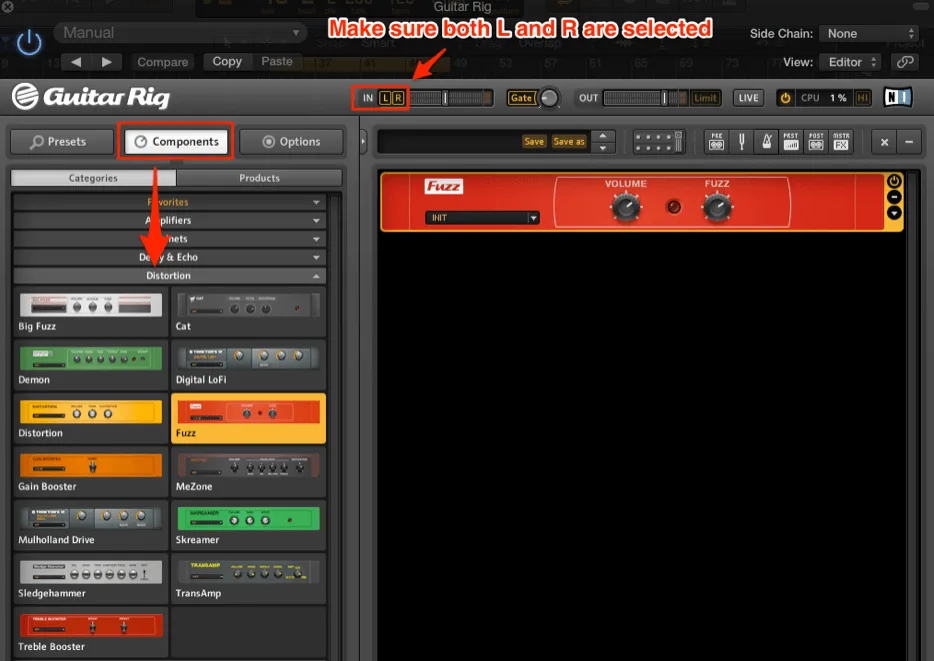
Though simple in execution, the effect and potential results are anything but.
2. Creating Next-Level Reverbs and Delays with Guitar Rig
Guitar Rig is packed with awesome reverb and delay presets that will give your music fantastic and expensive-sounding ambient feels. Set up the same signal chain as before (Guitar Rig in a send) and select a Reverb or Delay from the Presets section.

Click through the presets to find tons of unique delay and reverb sounds. Then, you can modify the preset by changing any of the parameters of the inserts in the right window. In particular, we love playing around with the Feedback and Reverse parameters of the Psychedelay.

Mix your new reverb/delay back in with your untouched dry signal to give a distinct ambience to those elements of your track. Oftentimes, these kinds of delays work perfectly with pianos especially.
3. Adding Body to Sounds Using the Pitch Pedal in Guitar Rig
Back again to Guitar Rig! One parameter worth mentioning here is Guitar Rig’s Pitch Pedal, which adds harmonic layers to sounds. If you ever get stuck with a sound that you wish could be bigger and more full (this should be everyone), Guitar Rig can help you fix that.
Once again, set up a send channel with Guitar Rig and select the Pitch Pedal.
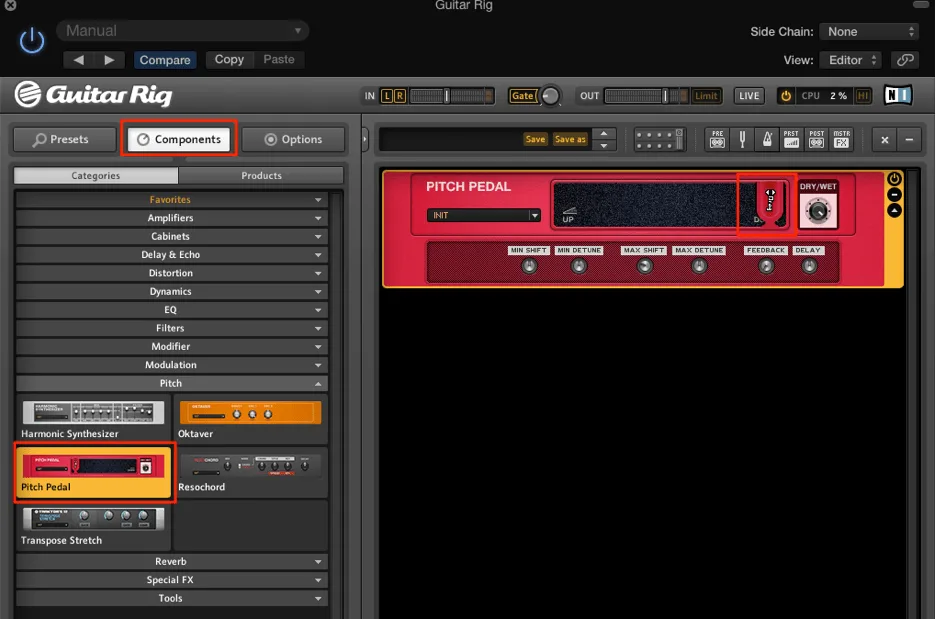
In the Init setting, move the slider all the way to the right to pitch your signal down one octave. You can also play around with some of the presets from the dropdown menu in the Pitch Pedal.
This plugin doesn’t do the cleanest pitch shift out there, but the grittiness and imperfection it adds can help to give your sound some extra body. Again, mix the pitched signal from the send lightly back in with the dry signal.
Hold Up. Why Do We Keep Using Sends?
This is something we teach extensively in the Hyperbits Masterclass because the real beauty in using a send is twofold.
First off, it allows us to use any effect as a completely separate channel. The benefits are endless, you can process solely the effect to your heart’s desire. Want to execute some reductive EQ on just the distortion? Want to thoroughly compress just a reverb signal? This is all possible by placing effects on a send.
The second beautiful benefit of using sends is parallel distortion. This means we can keep the original signal (the dry sound) and pair it with however much of the effect we want (the wet signal). We can substitute any plugin which lacks the super-useful ‘dry-wet’ knob by simply using an auxiliary send.
Pro Tip: Master the send channel workflow. It’s one of the most powerful techniques for creative mixing and gives you unprecedented control over your effects.
4. Using Logic’s Pedalboard for Small Distortions and Unique Modulations
Most Logic users know about the built in guitar amps, but not too many people use the Pedalboard plugin. This is set up similarly to Guitar Rig where the plugin actually houses several inserts that you can use to create its own signal chain.
Set up a send channel like we did for Guitar Rig, and throw on an instance of Pedalboard.
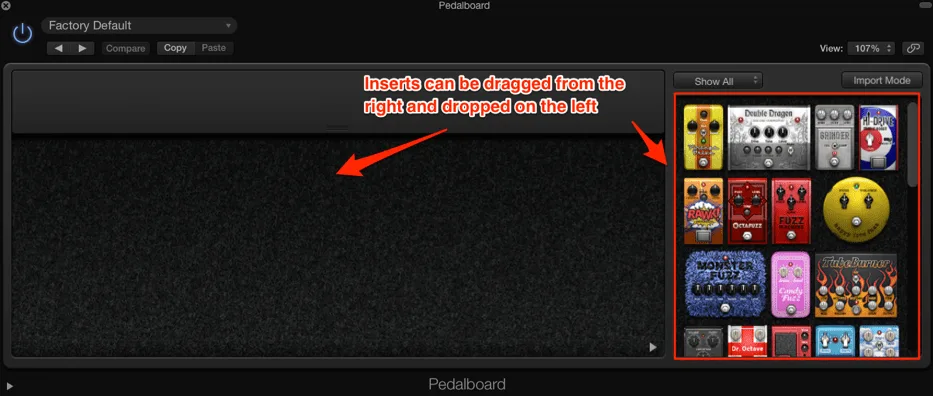
Use the dropdown menu to filter by the type of insert, and test out using one of the distortion plugins. Vintage Drive and Fuzz Machine are favorites, and typically, expect to get the best sounds when you crank the tone knob all the way up.
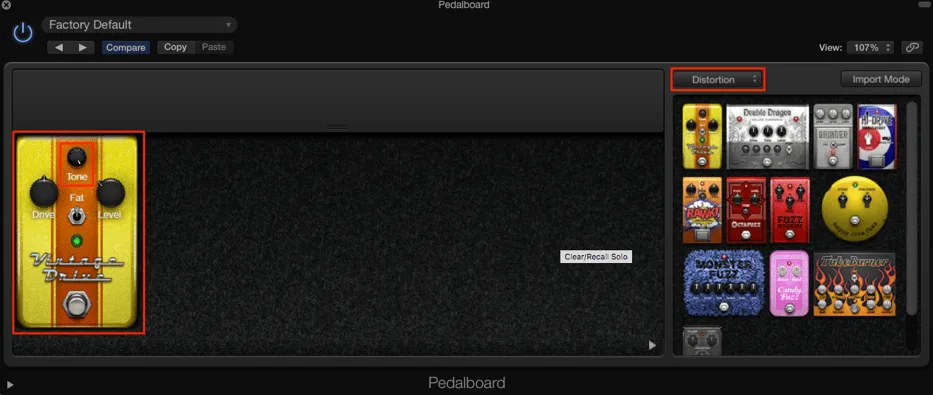
You can also get some cool, weird modulations to layer in. Filter by Modulation inserts and test out some of the cool choruses, flangers, and phasers. You can also combine one of these with a distortion plugin on the same Pedalboard instance.
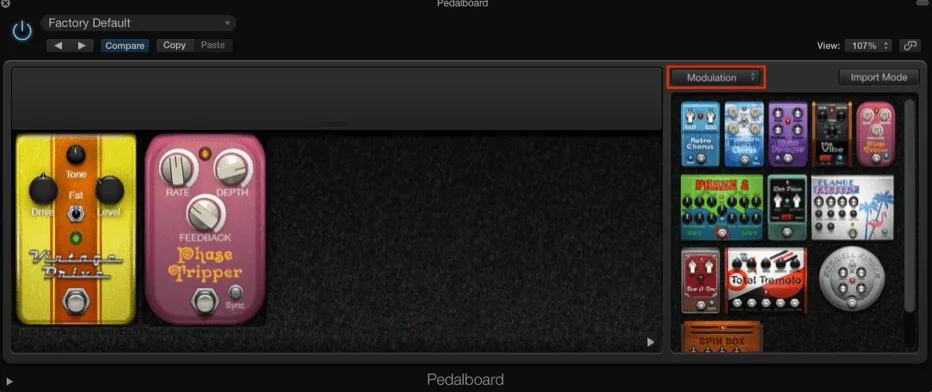
Similar to how we mixed in Guitar Rig, mix in a little bit of the new signal on the send with your untouched, dry signal for some huge parallel effects.
5. Waves Guitar Amp
One of the most popular and best-sounding Waves plugins is their GTR Amp. Set this up on a send channel and get some audio flowing through it. Again, we are going to use this sparingly as an amped, distorted signal to mix in with our dry signal (yes, you are seeing a trend here).
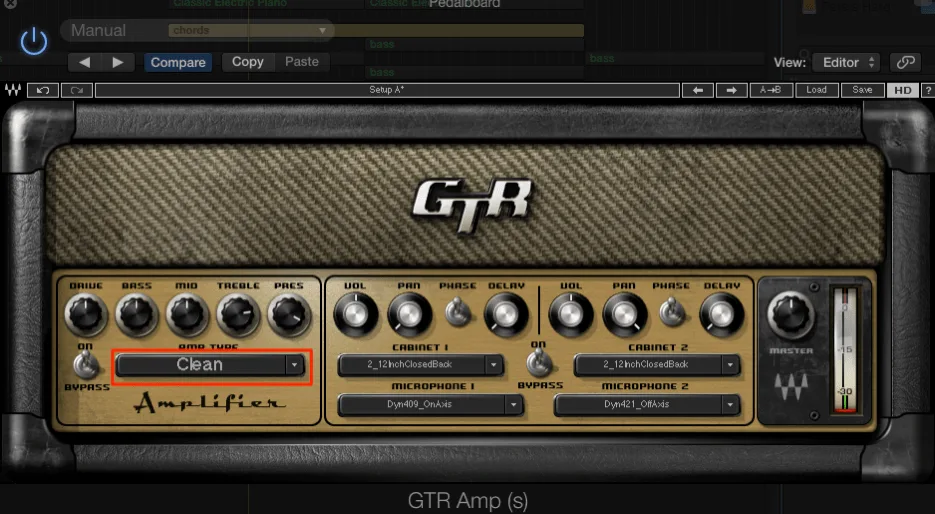
We love the Clean Amp settings in the highlighted box above. You can get some awesome, bright harmonics to mix in with your dry signal. I’d highly suggest trying this out on your pianos, lead synths, and maybe even some vocals.
Not too much more to add here, but this is an awesome plugin that gives you some bright, clean sounds that are highly accurate in emulating popular guitar amps.
Not sure what other types of amp plugins are out there? Check out our Ultimate Plugin Guide for Electronic Music.
6. Using an Amp Before a Reverb Plugin for Bright, Crunchy Reverbs
When you have a reverb bus you are sending audio to, inserting an amp plugin before your reverb plugin can result in some interesting, different-sounding reverbs.
Typically, the “clean” style guitar amp results in the best sounding reverbs (most likely due to the harmonic nature of the amp itself). In the example below, we’ve set the Waves GTR Amp before the reverb plugin.
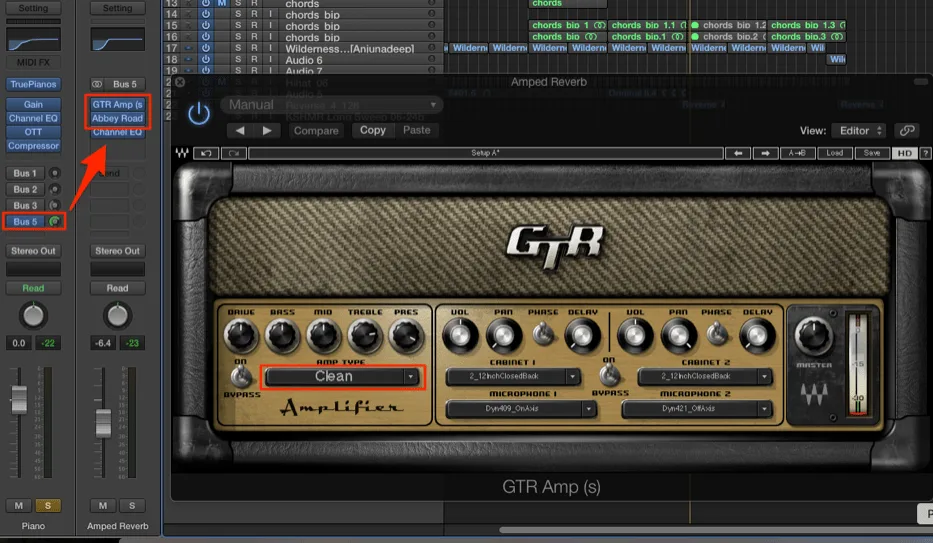
This results in a super bright, airy reverb, and on piano chords, it completely brings them to life. Consider this tip crucial for giving piano chords an energetic, up-front feel.
Pro Tip: Try the amp-before-reverb chain on a vocal bus too. A barely-there clean amp setting adds just enough harmonic saturation to make the reverb tail shimmer without sounding processed.
7. Inserting Guitar Rig onto Your Channel
So far, we’ve only talked about using guitar amps with send channels and lightly mixing them with a dry signal. But, of course, it goes without saying that we can also insert a guitar amp directly onto the channel (in lieu of a send).
That said, remember: you are totally forfeiting your dry signal and are only left with your amplified, fully wet signal.
Typically, this works best with actual guitar and bass sounds (and sometimes, pianos as well). But again, this creates a very distinct sound that can easily be overpowering.
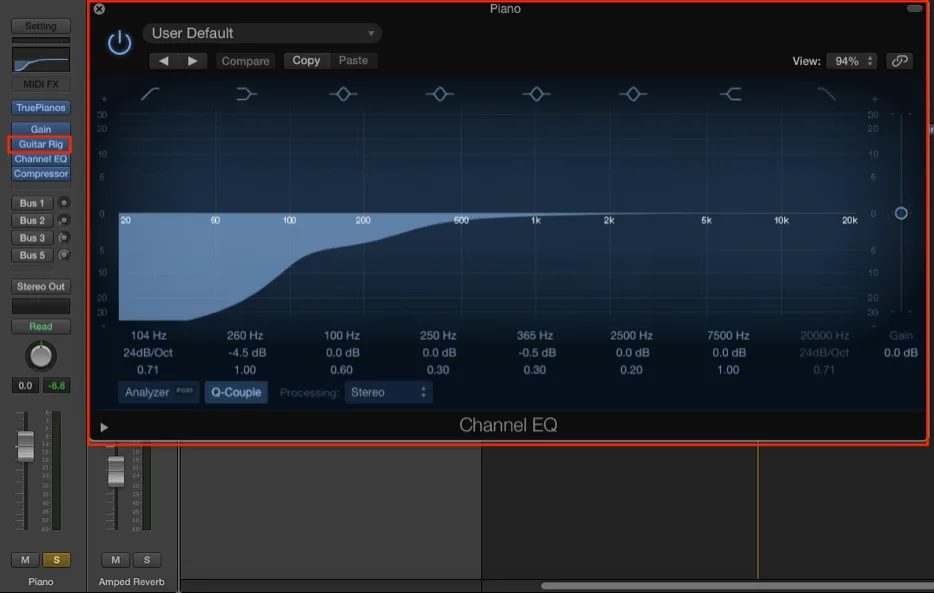
In the example above, I inserted Guitar Rig onto my channel. In general, go for clean, lightly amplified sounds, anything else will likely be overpowering.
Also, be sure to insert an EQ with a high pass filter after your guitar amp. Guitar amps can create some nasty, unwanted low frequencies (especially when dealing with digital synthesizers), so we want to be sure to remove those.
8. DIY Hardware for Totally Unique Distortions
One of the favorite pieces of equipment from Hyperbits Masterclass co-instructor, Pete of Anden, is a 12-year-old iPod dock that he got for free, and subsequently smashed up with a hammer.
We’re not joking. It barely works, and when you try to play something out of it, it is super distorted and crackly because it really is, in fact, broken. But, this is EXACTLY what we are going for here.
Get an old stereo or a bad pair of old computer speakers. Most people at least know someone with an old stereo sitting around in a closet, attic, or basement somewhere that they want to get rid of.
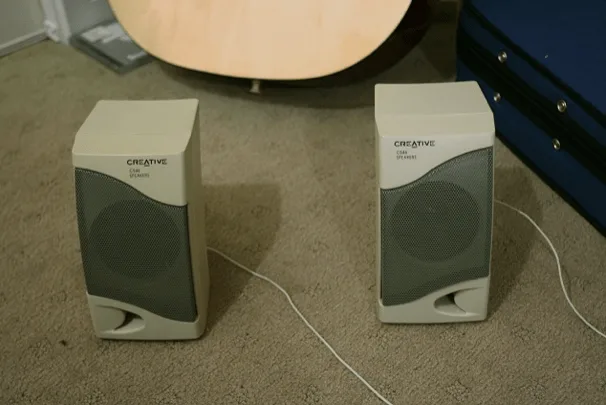
Now, mess up the speakers enough to distort the sound that comes out. Make them rattle and crunch when they get too loud, etc. And the fun part? You can now record this distorted audio and use it in your productions. For example:
- Write piano chords for your song and bounce just the chords as an mp3 or wav.
- Upload the piano as a private Soundcloud link, and play it off your phone through the old speakers.
- Record the distorted audio from your speaker with a microphone, and put this back into your DAW.
- Mix the distorted audio from your speakers with the original dry audio of the piano chords (yes, this is a really cool, unique form of parallel re-amplification).
This will give your chords an awesome distorted, organic feel that very few would easily be able to replicate.
Every technique in this post, from Guitar Rig sends to smashed iPod docks, comes back to the same core idea: adding controlled imperfection makes digital music feel alive. Start with one of these methods, learn it deeply, and then stack the rest.
The Sound Is in the Imperfection
Overall, there are lots of ways to use amps and pedals to bring analogue life into your digital productions. Our favorite technique for utilizing guitar amps is through parallel distortion (using these amps on sends).
Why should we care about guitar amps? Well, the proof is in the pudding, as they say. Guitar amps have been used in virtually all known western pop music over the past 60 years, so clearly, they have a place in music and aren’t going anywhere any time soon.
Heads up: some of the links below are affiliate links. If you buy through one, we earn a small cut (costs you nothing extra). But we'd point you at this exact gear whether we made a dime or not.