

Jump to a section8
Sidechain compression is compression triggered by a different sound. The compressor sits on one track but listens to another, so every time the kick hits, the bass (or the pads, or the whole mix) ducks out of its way.
Sidechain compression has not one, but two main purposes.
The first: that classic pumping effect (Eric Prydz’s ‘Call On Me’ or Deadmau5’s ‘Strobe’) that adds movement even without the kick. The second: creating space and making tracks breathe and react to the music itself. That’s a different game entirely.
I’m writing this to create the definitive guide to sidechain compression. You’ll learn what it is, how and why to use it, and get actionable pro tips to sharpen your game.
What Is Sidechain Compression?
Sidechain compression is like regular compression but with one crucial difference: it listens to one channel and reduces the volume of another. Standard compression reduces a channel based on its own volume. Sidechain compression reduces a channel based on another element.
You have two tools: traditional sidechain and LFO sidechain.
Traditional sidechain uses a compressor with sidechain enabled. Select the trigger channel and use standard compressor parameters to control gain reduction. It’s best for subtle, organic effects, like sidechaining a vocal that’s not grid-locked. Try FabFilter Pro-C, Waves RCompressor, or your stock plugin.
LFO sidechain was pioneered by Steve Duda (who also created Serum). It doesn’t use a trigger channel. Instead, you design an LFO shape and tempo that reduces volume at a set rate. It’s perfect for dance music, letting you duck sounds on every beat to make room for the kick.
Try LFO Tool, Nicky Romero Kickstart, or Soundtoys Tremolator.
Why Use Sidechain Compression?
There are two main reasons to use sidechain compression: to create space in your mix and to create a stylistic effect.
If you’re looking to create space in your mix, sidechain compression will help reduce the volume of a channel in response to a separate trigger channel, making it an effective tool to get the two channels “out of the way” of each other. With sidechain in practice, when the trigger channel gets loud, the main channel gets quiet, and vice versa.
This is great for balancing kick and bass levels and balancing a vocal and a synth. If you’re looking to create a “pumping” stylistic sound that characterizes so much of electronic music, sidechaining is the answer. Whether that’s the “on-off-on-off” pump characteristic of house and trance or the sudden dips in the volume of synth stacks in music from Flume, Madeon, and Porter Robinson, the pro tips below cover both strategies in depth.
How To Sidechain A Compressor
Technically speaking, sidechaining a compressor is pretty straightforward. You begin by adding the compressor to the channel whose volume you want to reduce, and then you select the trigger channel you want the compressor to respond to.
Whether you’re in Logic Pro, Ableton, or FL Studio, here’s a quick breakdown of how to set up simple input triggers with each DAW’s stock plugins.
How To Sidechain In Logic Pro
Logic’s stock compressor is a powerful plugin with a fairly intensive GUI. While this may seem intimidating when you’re first getting familiar with sidechain compression, setting up a simple input trigger is actually fairly straightforward. It can be done in just a few quick steps.
Step 1: Add the compressor to the channel you want to reduce in volume.
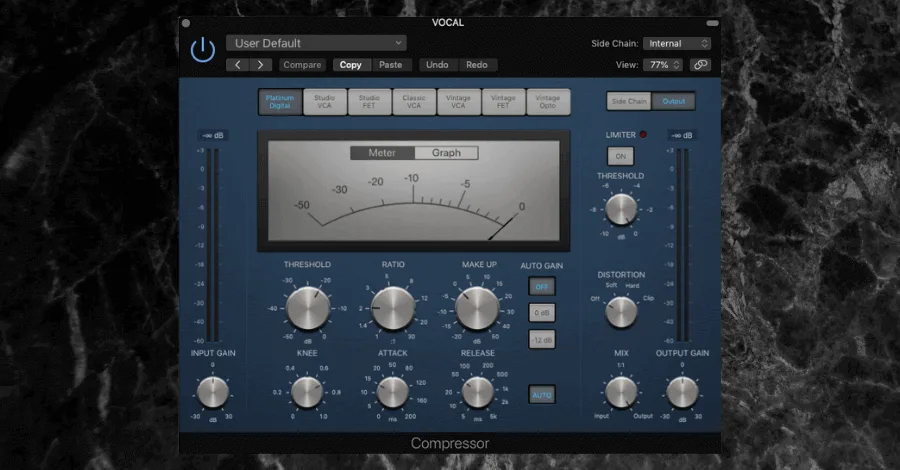
Step 2: From the “Side Chain” dropdown, select the trigger channel. This can be an audio track, a MIDI track, or a bus.
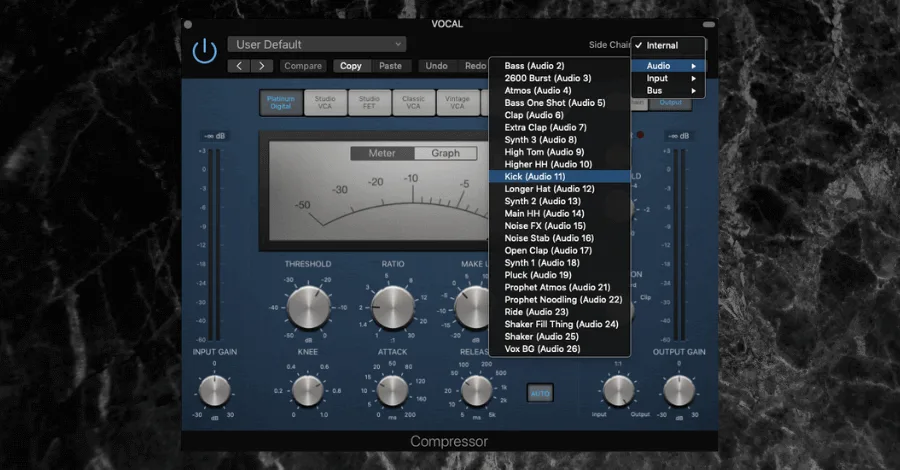
Step 3: That’s it! It really is that simple.
How To Sidechain In Ableton Live
Working in Ableton? The step-by-step Ableton sidechain walkthrough covers every setting in more detail.
Ableton Live is one of the most popular DAWs in the industry and offers a ton of different tools to help with dynamic control and mixdown improvements. For sidechaining, we recommend using the classic compressor plugin and not the glue compressor.
While the glue compressor brings a lot to the table, it does not allow for precise and minute adjustments in the attack and release settings which is paramount to many of the tricks outlined below.
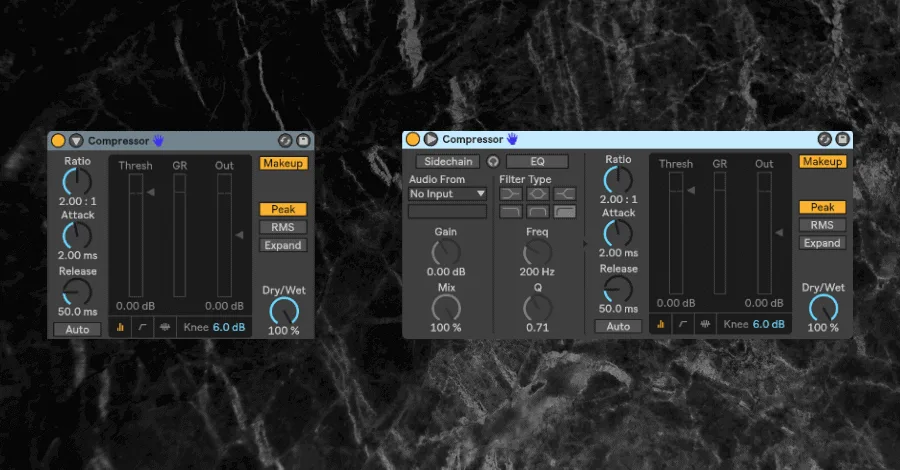
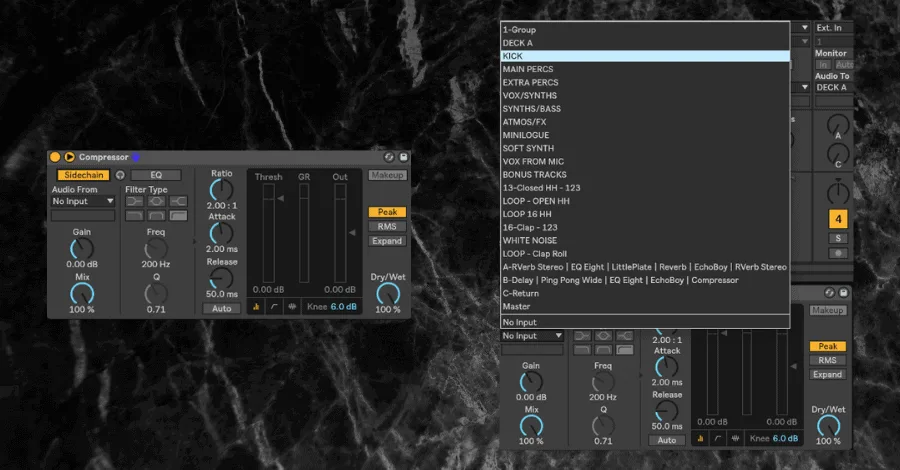
Step 1: Add the compressor to the channel you want to reduce in volume and click the down arrow to see the expanded menu options.
Step 2: Click the “Sidechain” button and select the trigger channel from the “Audio From” dropdown.
How To Sidechain In FL Studio
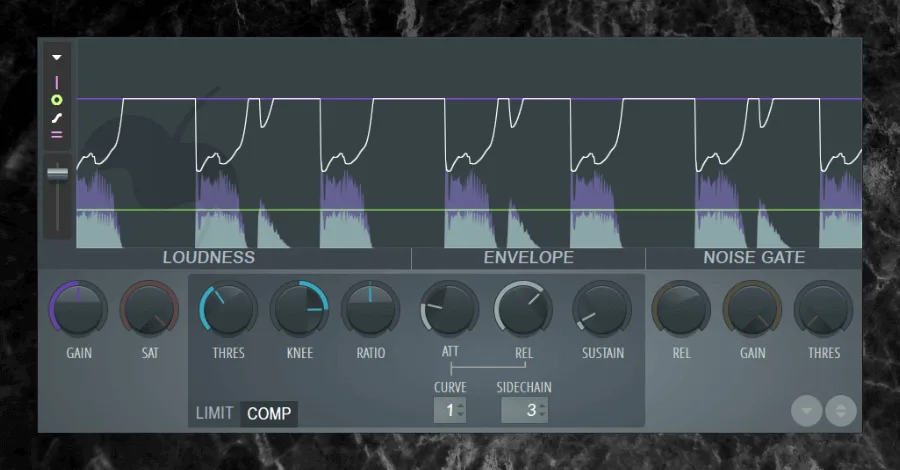
FL Studio’s stock compressor offers a bit more control features than the previous DAWs. The noise gate features envelope controls that behave slightly different than the classic attack and release parameters typically seen on most compressors.
Nonetheless, setting up standard sidechain inputs is just as easy and straightforward as in any other DAW.
Step 1: Add Fruity Limiter to the channel you want to reduce in volume.
Step 2: Click into the COMP section from the ‘SIDECHAIN’ dropdown to select your trigger. It’s that easy!
Sidechaining Pro Tips
Almost everyone associates sidechain compression with creating that pumping effect typically seen in dance music, and while we certainly will cover how to achieve this, sidechaining can do so much more to your mixdowns once you know how to apply it correctly.
In this section, we will be breaking down high-level tips and tricks professional producers and mix engineers use in almost every mix to achieve movement, space, and power in each and every mixdown.
Pro Tip 1: Sidechaining Your Bass To Your Kick
Sidechaining to your kick is the most common use of sidechains in electronic music. Both your kick and your bass occupy the low end of your mix, and because they are both so huge, we don’t want them playing at the same time.
Sidechain compression thrives for exactly these situations, and we can use either an LFO sidechain or a traditional sidechain to get your bass out of the way of your kick. I like using LFO style sidechains most of the time. Here’s how.

Step 1: Insert the LFO style sidechain plugin onto the channel with the bass. LFO sidechain doesn’t use a trigger channel to determine when to reduce the volume of the main channel. Rather, you can design a shape and tempo within an LFO sidechain plugin that will repeatedly reduce your channel volume at a certain rate.

Step 2: Set the rate to ¼. LFO sidechain is especially useful for sidechaining sounds to a kick drum in 4x4 dance music (like most EDM, house, and techno). Effectively, you can set your LFO sidechain to reduce your signal volume at the beginning of every beat of the track, which will get sounds out of the way of your kick drum.
Pro Tip: The rate and shape are the two most important parameters to dial in for sidechain compression. Get these right before tweaking anything else.

Step 3: Set the shape so the volume is reduced at the beginning of the beat. This is why LFO Tool (the plugin pictured throughout this example) is the choice tool for the job. It’s completely customizable and remains the most powerful LFO sidechain plugin on the market.
Pro Tip 2: Sidechaining Instruments To Make Room For The Vocal
Electronic music is often characterized by lush, full, massive-sounding synths. We love this about electronic music, but sometimes it can be difficult to squeeze in a vocal amidst this huge wall of sound.
The traditional sidechain can reduce the volume of your synths just enough to make a pocket for the vocal. The key is to use this subtly. We don’t want it to feel like the synths are dropping in volume, but rather that there is a little more space for the vocal to shine through. Here’s how it’s done.
Step 1: Set up a bus that contains all the synths and instruments you want to sidechain. This may include synths, pads, FX, and anything else you believe may be clashing with your vocals in your track.

Step 2: Insert your compressor onto that new bus. Here, we’re using traditional compression because the vocal isn’t perfectly snapped to the grid of the track. We want it to be more dynamic, which means that FabFilter’s Pro-C is the obvious choice of tools.

Step 3: Set the sidechain input to the vocal track.

Step 4: Use a low ratio (I like 2:1) and a medium to long attack and release on the compressor (start at 100ms for the attack and 300ms for the release, and tweak from there). We do this to help the compression be more transparent since any obvious compression here will make the overall effect appear unnatural. The low ratios and long attack and release will help create space for the vocal without bringing too much attention to the fluctuating volume.


Step 5: If you are using a compressor like Pro-C, set the trigger to Ext in the Sidechain section. This is where the Pro-C really shines, as dialing in on the parameters allows for better control and added detail that is simply second to none.
That being said, another option that creates similar results is the Waves RCompressor, which offers a quick plug-and-play solution that is effective in most of these sidechain scenarios.

Step 6: Reduce the threshold until you start to see ~3db gain reduction when the vocal is playing. This tends to be the sweet spot of gain reduction, as it is just enough room for the vocal to pop through without making the compression on the instrument bus too obvious.
Pro Tip 3: Band-Splitting with LFO Tool

LFO Tool is an insanely powerful plugin. But sometimes, its effect on a sound can be overpowering. In order to get the benefits of sidechaining without having an overwhelming pumping feel in the track, I LOVE using the band-split feature.
Band-splitting allows you to only sidechain above or below a certain frequency. Imagine sidechaining your bass to your kick. With band-splitting, you can only sidechain the low frequencies and leave the higher frequencies untouched, which gives you the benefit of reducing the low end of the bass without creating an overwhelming “pumping feel.”
Step 1: Insert LFO style sidechain plugin onto the channel with the bass.
Step 2: Make sure the rate is set to ¼.
Step 3: Set the shape so the volume is reduced at the beginning of the beat.
Step 4: Enable bandpass, set to Low Pass, and set the frequency to 300Hz. Tweak the frequency from there.
Pro Tip 4: Input Monitoring with Traditional Sidechain
Sometimes when we sidechain, there are only certain parts of one sound during which we want to reduce another. For example, we might only want to sidechain a sound to the transient click of our kick and the occasional sibilance of a vocal.
How do we deal with these scenarios? We use input monitoring, which isn’t a feature of all compressors. We recommend using Fabfilter Pro-C as a third-party option, but luckily the stock compressors in Ableton and Logic allow for this as well.
What you do is listen to the signal you are sidechaining against. You can use an EQ to isolate the frequencies of the trigger channel you want your compressor to respond to. For example, in the input monitor, you use a high pass filter to isolate the high transient of the kick drum, and now your compressor will only respond to that frequency. Here’s how it’s done using Fabfilter’s Pro-C.
Step 1: Start by inserting your compressor for traditional sidechaining.
Step 2: Set your sidechain input channel.

Step 3: In the Sidechain section, click Ext and Audition (now, you’ll hear the kick drum).

Step 4: Use a high pass filter to isolate the frequencies in the trigger channel you want to respond to (for example, the high-end “click” of the kick drum).

Step 5: Turn off Audition (it will save your changes). Now you can tweak the threshold to taste.
Pro Tip 5: Multiband Sidechaining with Pro-MB
As we were input monitoring in the pro tip outlined above, we were tweaking the frequencies on the trigger channel in isolation. With Multiband Sidechaining, we tweak the frequencies on the signal we are actually sidechaining.
This works very similarly to band splitting in LFO Tool. With multiband sidechaining, we select a frequency band where we want to perform the gain reduction. So, instead of reducing the volume of the entire signal, we are just reducing a certain band. This is especially useful for sidechaining a bass against a kick. But my favorite use of this technique is sidechaining instruments against a vocal and only reducing the frequencies in the instruments that sit where the vocal is sitting.
We recommend using Fabfilter Pro-MB for this. There are other options, but Pro-MB provides the most control and flexibility.
Step 1: Insert Pro-MB on the channel you want to sidechain (in this case, the Synths bus).

Step 2: Set your sidechain input channel (in this example, we’ll be using the vocal).

Step 3: Create your band in Pro-MB. I’m going to reduce from 500hz-2kHz, where most of the vocal is sitting.

Step 4: Click Expert and EXT (for external input) on the band.

Step 5: Set a medium attack and release, and drop the threshold until you get ~3db gain reduction. You can tweak it from there, but this is the advised starting point.
Pro Tip 6: Mid-Side Sidechaining With Pro-MB
We can apply the same intuition from multiband sidechaining to mid-side sidechaining. Rather than selecting a frequency band to sidechain, we select to sidechain either the mid or side frequencies.
This is especially useful when sidechaining a wide bass to a narrow kick. We can reduce the mid frequencies of the bass when the kick is hitting but can leave the wide frequencies untouched. And with Pro-MB, we can even combine multiband sidechaining and mid-side sidechaining for Mid-Side Multiband Sidechaining.
Step 1: Insert Fabfilter’s Pro-MB on the channel you want to sidechain (in this case, the Synths bus).
Step 2: Set your sidechain input channel (we’ll once again be returning to the vocal in this example).

Step 3: Create your band in Pro-MB. Drag the band to cover the entire frequency spectrum.

Step 4: Click Expert and the EXT (for external input) on the band.

Step 5: This is where things start to get a bit trickier. Drag the Stereo Link slider all the way to the right. This sets it to only reduce the mid frequencies.

Step 6: Set a medium attack and release, and drop the threshold until you get ~3db gain reduction. As before, this is a general starting point that you can further tweak to your own needs.
Pro Tip 7: Sidechain Reverbs And Delays To The Dry Signal
This last tip can be used to both create space and clarity in your mix or to create an effect. When you add reverb or delay to a sound, sidechain the reverb or delay back to the dry signal. This reduces the volume of the reverb/delay when the dry signal is playing and accentuates the reverb/delay when the dry signal stops.
There are two cases where we use this trick all the time. The first is on vocals for cool delays at the end of each vocal phrase. The second is on huge synth stacks to create a vacuum-like space at the end of a big chord stab.
Step 1: Send your dry signal out to a reverb or delay bus.

Step 2: Insert a compressor onto the send. Placement of your plugins here is incredibly important, so ensure that you are placing your compressor after the reverb or delay plugin to allow the pumping effect to be applied to the tail of the reverb.

Step 3: Set the sidechain input to the dry signal.

Step 4: Set to Ext, set a slower attack and release, and reduce the threshold until you get about 10db gain reduction. This is much more gain reduction than in the other tips. Why? Because we typically don’t want to hear this effect at all when the dry signal is playing.

Step 5: Tweak the compressor release time to adjust how quickly the reverb/delay jumps in after the dry signal ends.
My favorite use of this technique is in Sun & Moon by Above & Beyond. Listen to the sidechaining on those synth chords. Here’s a video walkthrough of a similar approach using LFO Tool to build creative stutter and sidechain movement effects:
The same principles from that stutter tutorial apply to the reverb sidechain trick. Play around with the release time and you’ll hear the exact moment when the reverb tail starts to bloom back in.
Sidechain Is Non-Negotiable
Sidechain is a critical tool for electronic music producers. Remember, we can use it for two purposes: to create space in a mix, and for a creative effect.
For more on getting the low end right, check out our guide on the perfect kick-bass relationship.
We talk all about sidechain compression in our courses Mix Master Flow and the Hyperbits Masterclass.
Making professional music is damn hard, and knowing how to sidechain is only one of the many skills a professional producer must master. Now get out there and start sidechaining.
Heads up: some of the links below are affiliate links. If you buy through one, we earn a small cut (costs you nothing extra). But we'd point you at this exact gear whether we made a dime or not.